Seeding Your Database with Data
Question
How do I populate my databases with a static dataset using Atlas?
Answer
Atlas offers two methods for seeding your database with data: declarative data management and manually inserting data using migration or plan files.
Declarative Data Management
Declarative data management is available only to Atlas Pro users. To use this feature, run:
atlas login
To include data you need in your application by default, add each row to your desired schema using data blocks in HCL,
or INSERT statements in SQL:
- HCL
- SQL
table "countries" {
  schema = schema.public
  column "id" {
    type = int
  }
  column "code" {
    type = varchar(2)
  }
  column "name" {
    type = varchar(100)
  }
  primary_key {
    columns = [column.id]
  }
}

data {
  table = table.countries
  rows = [
    { id = 1, code = "US", name = "United States" },
    { id = 2, code = "IL", name = "Israel" },
    { id = 3, code = "DE", name = "Germany" },
    { id = 4, code = "VN", name = "Vietnam" },
  ]
}
CREATE TABLE countries (
    id INT PRIMARY KEY,
    code VARCHAR(2) NOT NULL,
    name VARCHAR(100) NOT NULL
);

INSERT INTO countries (id, code, name) VALUES
    (1, 'US', 'United States'),
    (2, 'IL', 'Israel'),
    (3, 'DE', 'Germany'),
    (4, 'VN', 'Vietnam');
To use this feature, configure sync behavior in your environment on the specific tables:
env "prod" {
  ...
  data {
    mode     = UPSERT         // INSERT, UPSERT, or SYNC
    include  = ["countries"]  // e.g., "public.*"
  }
}
You control how Atlas handles data changes with three modes:
- INSERT - Add new rows only, never touch existing data
- UPSERT - Insert new rows, update existing ones by primary key
- SYNC - Full sync: insert, update, and delete to match desired state
Skipping Columns from Diff
Columns with dynamic defaults (like now()) can cause false UPDATE statements on every diff. Use skip_diff
to exclude them from data comparison:
env "prod" {
  ...
  data {
    mode      = UPSERT
    include   = ["users"]
    skip_diff = ["*.updated_at", "*.created_at"]
  }
}
For more details, see the data configuration.
Manual Data Management
Versioned Workflow
If you are using versioned migrations to manage your schema, seeding can be done by introducing a new migration file
that contains INSERT statements with the desired data.
To create the empty migration file, run:
atlas migrate new
Next, paste your desired INSERT statements.
For example, for a schema containing a table called users with name and age columns,
INSERT INTO users (name, age)
VALUES
    ('John', 30),
    ('Jane', 32);
After saving the changes to the migration file, run:
atlas migrate hash
This command will recalculate the checksums for the migration directory in atlas.sum.
Finally, run atlas migrate apply and Atlas will automatically apply the INSERT statements to your database.
Template Directories
Another option when working with a versioned workflow is using dynamic template-based directories.
For example, let's say you have a simple table users that you want to add two records to.
enum "roles" {
  schema = schema.public
  values = ["user", "admin"]
}

table "users" {
  schema = schema.public
  column "role" {
    type = enum.roles
  }
  column "data" {
    type = json
    null = true
  }
}
schema "public"{}
First, define the data you plan to insert as a JSON Lines file:
{"name": "Ariel"}
{"name": "Rotem"}
Next, update your atlas.hcl file to parse the data and pass it to the migration template:
locals {
  # The path is relative to the `atlas.hcl` file.
  seed_users = split("\n", file("seed_users.json"))
}

data "template_dir" "migrations" {
  path = "migrations"
  vars = {
    seed_users = local.seed_users
  }
}

env "dev" {
  dev = "docker://postgres/17/dev"
  migration {
    dir = data.template_dir.migrations.url
  }
}
Finally, create a new migration file by running atlas migrate new seed_users --edit and paste the following statement:
{{ range $line := .seed_users }}
  INSERT INTO `users` (`role`, `data`) VALUES ('user', '{{ $line }}');
{{ end }}
This file expects a data variable named seed_users of type []string. It then loops over this variable and INSERTs
a record into the users table for each JSON line.
To check that our data interpolation works as expected, run atlas migrate apply on a temporary PostgreSQL container
that Atlas will spin up and tear down automatically for us:
atlas migrate apply \
  --env dev \
  --url docker://postgres/17/dev
Example output
Migrating to version 20230719102332 (2 migrations in total):

  -- migrating version 20230719093802
    -> CREATE TABLE `users` (
  `id` bigint NOT NULL AUTO_INCREMENT,
  `role` enum('user', 'admin') NOT NULL,
  `data` json,
  PRIMARY KEY (`id`)
) AUTO_INCREMENT=1000;
  -- ok (38.380244ms)

  -- migrating version 20230719102332
    -> INSERT INTO `users` (`role`, `data`) VALUES ('user', '{"name": "Ariel"}');
    -> INSERT INTO `users` (`role`, `data`) VALUES ('user', '{"name": "Rotem"}');
  -- ok (13.313962ms)

  -------------------------
  -- 95.387439ms
  -- 2 migrations
  -- 3 sql statements
Declarative Workflow
Currently, there is no support through Atlas for defining a "data state". However, it is possible to use the
schema plan command and edit the plan to include INSERT statements.
The atlas schema plan command is available exclusively to Pro users. To use this feature, run:
atlas login
Local Setup
Let's start with a local example. We'll begin with a base schema.pg.hcl file containing a table users
and configure an atlas.hcl file with our local database URL, dev database URL, and schema file path:
- Schema Definition
- Config File
table "users" {
  schema = schema.public
  column "data" {
    type = json
    null = true
  }
}
schema "public" {}
env "local" {
    # URL to the target database
    url = "postgres://postgres:pass@localhost:5432/dev?sslmode=disable"
    # URL to the dev-database
    dev = "docker://postgres/17/dev"
    # Desired schema state
    schema {
        src = "file://schema.pg.hcl"
    }
}
Set up your local database with this schema by running
atlas schema apply --env local --auto-approve
Let's add a role column to the users table and an enum type to represent it.
enum "roles" {
  schema = schema.public
  values = ["user", "admin"]
}

table "users" {
  schema = schema.public
  column "role" {
    type = enum.roles
  }
  column "data" {
    type = json
    null = true
  }
}
schema "public" {}
To locally generate a migration plan for adding the role column to the users table and save the plan to
a file that can be edited manually, run:
atlas schema plan --save --env local
The output will look something like this:
Planning migration from local database to file://schema.pg.hcl (2 statements in total):

  -- create enum type "role":
    -> CREATE TYPE "public"."role" AS ENUM ('user', 'admin');
  -- modify "users" table:
    -> ALTER TABLE "public"."users" ADD COLUMN "role" "public"."role" NOT NULL;

-------------------------------------------

Analyzing planned statements (2 in total):

  -- data dependent changes detected:
    -- L4: Adding a non-nullable "role" column "role" will fail in case table "users" is
       not empty https://atlasgo.io/lint/analyzers#MF103
  -- ok (287.375µs)

  -------------------------
  -- 50.243375ms
  -- 2 schema changes
  -- 1 diagnostic

-------------------------------------------

Plan Status: SAVED
  -- Atlas URL: file://20250317112745.plan.hcl
Open the file and add the INSERT statements for the data you want to input to your database to the plan's migration field.
plan "20250317112745" {
  from      = "E+w50mxU/6XEiChiDmS+uGi154Q5QXy4l+F3eawDaT0="
  to        = "STrYroQXyw6QSYDu8Y8yHC9qUtH5CSmLVuJ7imhqgZM="
  migration = <<-SQL
  -- Create enum type "role"
  CREATE TYPE "public"."role" AS ENUM ('user', 'admin');
  -- Modify "users" table
  ALTER TABLE "public"."users" ADD COLUMN "role" "public"."role" NOT NULL;
  INSERT INTO users (role, data) VALUES
    ('user', '{"name": "Ariel"}'),
    ('user', '{"name": "Rotem"}');
  SQL
}
Finally, running atlas schema apply --env local --plan "file://20250317112745.plan.hcl" will apply the changes to the database.
Applying approved migration using pre-planned file 20250317112745 (3 statements in total):

  -- create enum type "role"
    -> CREATE TYPE "public"."role" AS ENUM ('user', 'admin');
  -- ok (703.625µs)

  -- modify "users" table
    -> ALTER TABLE "public"."users" ADD COLUMN "role" "public"."role" NOT NULL;
  -- ok (692.75µs)

  -- applying statement 3
    -> INSERT INTO users (role, data) VALUES
           ('user', '{"name": "Ariel"}'),
           ('user', '{"name": "Rotem"}');
  -- ok (307.458µs)

  -------------------------
  -- 1.825875ms
  -- 1 migration
  -- 3 sql statements
Using Atlas Registry
Teams using Declarative Migrations with the Schema Registry, typically have plans generated during the PR (Pull Request) process and stored in the repository.
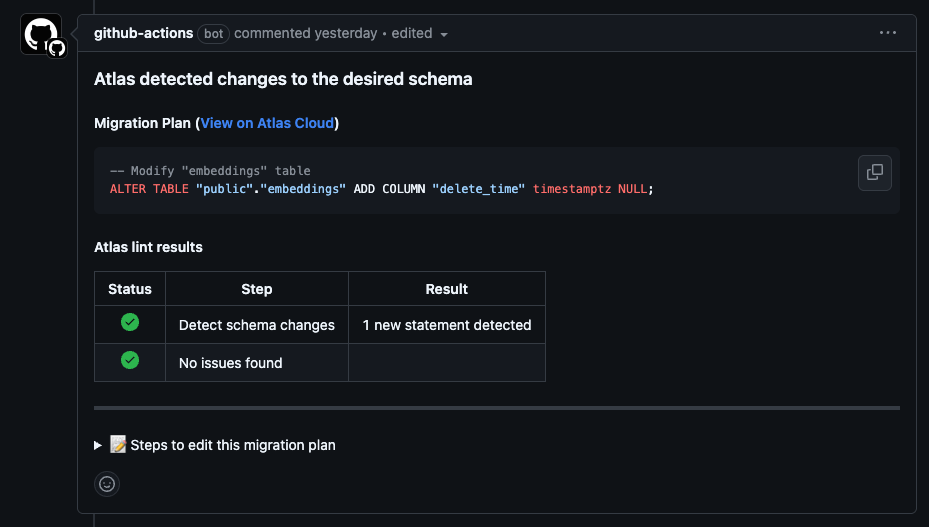
The bottom of the comment contains instructions for editing the plan file and applying the changes, these plans look similar to this:
📝 Steps to edit this migration plan
1. Run the following command to pull the generated plan to your local workstation:
atlas schema plan pull --url "atlas://raggler/plans/pr-11187-EOZSqdJl" > pr-11187-EOZSqdJl.plan.hcl
2. Open pr-11187-EOZSqdJl in your editor and modify it as needed. Note that the result of the plan should align
the database with the desired state. Otherwise, Atlas will report a schema drift.
3. Push the updated plan to the registry using the following command:
atlas schema plan push --pending --file pr-11187-EOZSqdJl.plan.hcl
4. Re-trigger the schema/plan action to update this comment:
gh run rerun 13964259192
To incorporate data seeding into such a plan, simply add DML (INSERT/UPDATE/DELETE) statements to the
migration field of the plan file before applying it, running the schema push command, and re-triggering the
schema/plan action.
Have additional questions or feedback? Feel free to reach out on our Discord server.