Schema as Code: Directory Structure for HCL Files

Question

How do I configure Atlas to load the database schema from nested directories with HCL files?

 /project
├── main.hcl
├── extensions
└── schemas
└── public
├── public.hcl
├── tables
│ ├── pets.hcl
│ ├── posts.hcl
│ ├── profiles.hcl
│ └── user_groups.hcl
├── functions/
└── types/

Features Not Supported by the Community Release

After upgrading Atlas, you might encounter an error stating "Feature X is no longer supported by this release."

For example:

Error: data.external_schema is no longer supported by this release.

This occurs when you install the community version of Atlas, which lacks some features available only in non-community builds.

How do I resolve out-of-order migration conflicts after a hotfix?

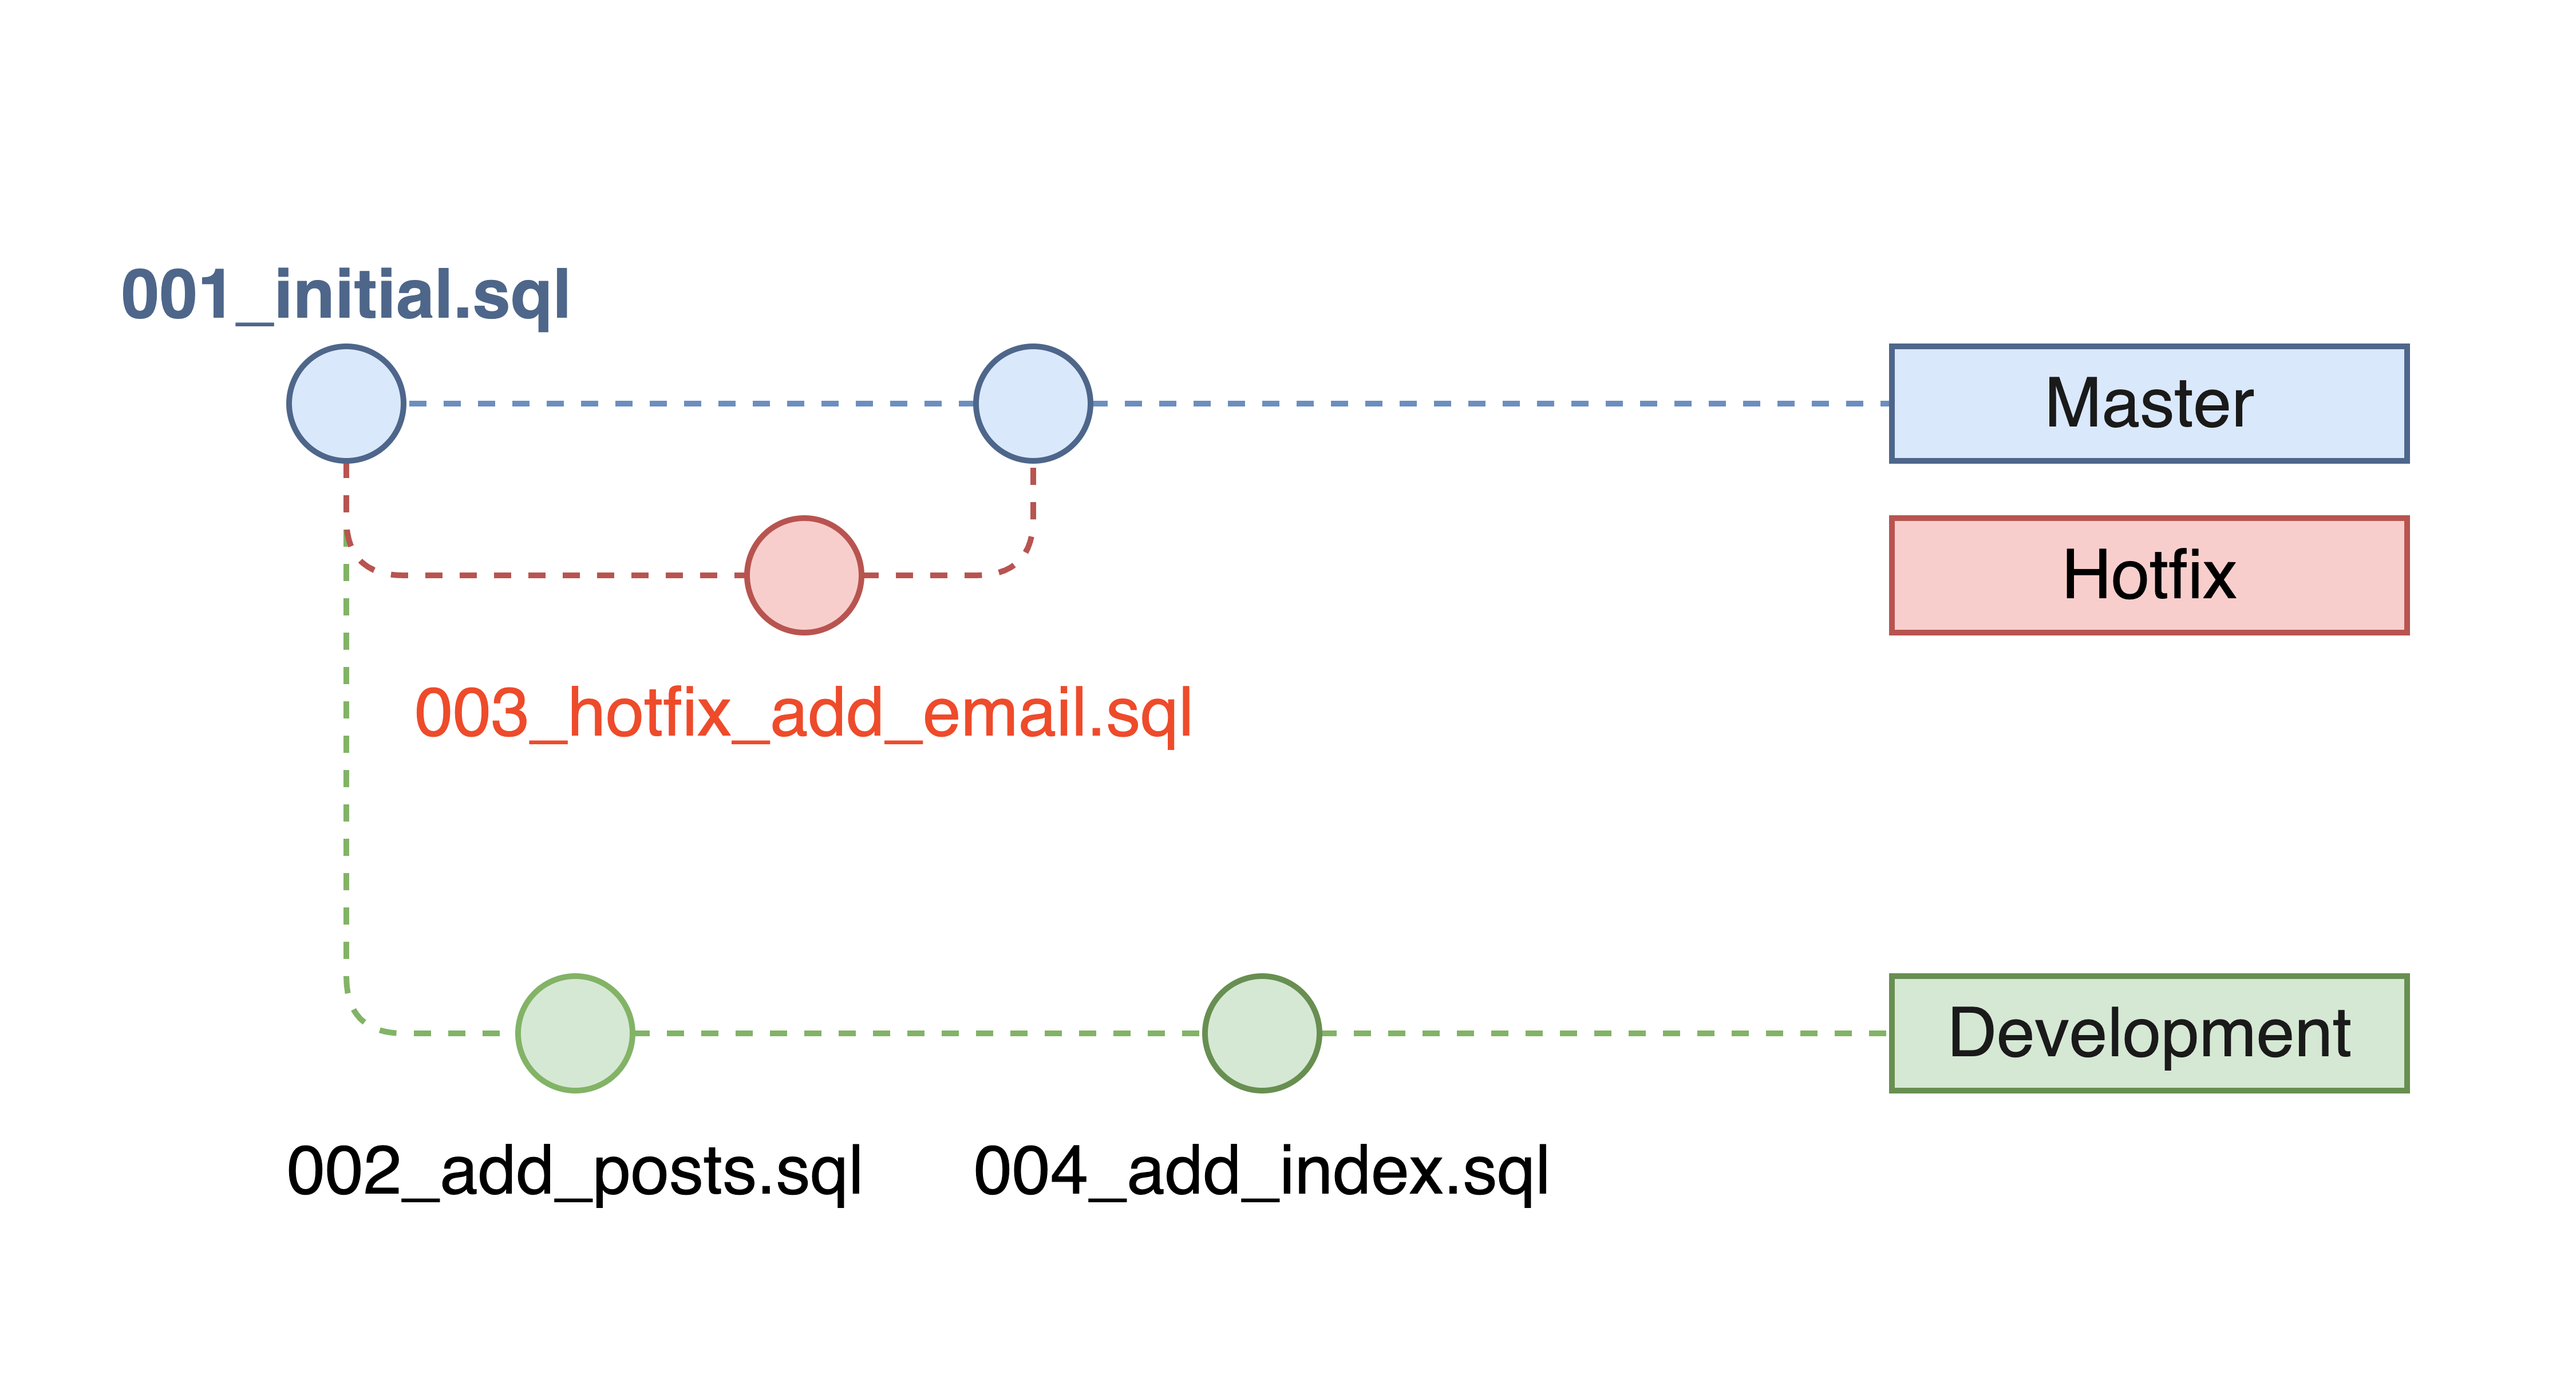
When working with multiple branches and applying hotfixes directly to production, out-of-order migration conflicts may occur if migration files are created with timestamps that don't reflect the actual merge order.

The Problem

Consider this scenario:

Initial state:

  • Master branch:
    • 001_initial.sql
  • Dev branch (PR pending):
    • 001_initial.sql
    • 002_add_posts.sql
    • 004_add_index.sql

After hotfix applied directly to production:

  • Master branch:
    • 001_initial.sql
    • 003_hotfix_add_email.sql ← hotfix added
  • Dev branch (unchanged):
    • 001_initial.sql
    • 002_add_posts.sql
    • 004_add_index.sql

out-of-order migrations

After merging master into dev - the problem:

  • 001_initial.sql - Applied to production
  • 002_add_posts.sql - Dev-only, not applied to production
  • 003_hotfix_add_email.sql - Applied to production
  • 004_add_index.sql - Dev-only, not applied to production

This creates a non-linear migration history where migration files 002 and 004 were created before and after the hotfix timestamp but haven't been applied to production.

The Solution

Step 1: Get latest changes

Incorporate the latest changes from master into your dev branch:

git checkout dev
git merge master # or git rebase master

This will create a conflict in the atlas.sum file, which is expected. Resolve the git conflicts as usual, choosing any version number for atlas.sum.

The version number doesn't matter because you will then re-hash the migration directory by running:

atlas migrate hash

Step 2: Fix your development database

Since the hotfix was applied to production but not to your dev database, you must bring your dev database to a consistent state before rebasing migrations.

# Apply only the missing hotfix migration
atlas migrate apply --url "mysql://root:pass@localhost:3306/development" \
--exec-order non-linear

The --exec-order non-linear flag in Atlas lets you run migration files even if they weren’t created in order. This is handy when multiple developers add migrations at the same time and version numbers don’t line up. Learn more about execution order options.

Step 3: Rebase migrations

With your dev database in a consistent state, run atlas migrate rebase <versions> to shift pending migrations to come after the hotfix. Rebase only the files that haven't been applied to production:

# Rebase the dev-only migrations
atlas migrate rebase 002 004

This command will:

  • Rename the out-of-order migration files with new timestamps that come after the hotfix
  • Update the atlas.sum file with the new checksums

Step 4: Verify the rebase

After rebasing, your migration directory should look like:

migrations/
├── 001_initial.sql
├── 003_hotfix_add_email.sql # hotfix from master
├── 005_add_posts.sql # rebased (was 002_add_posts.sql)
├── 006_add_index.sql # rebased (was 004_add_index.sql)
└── atlas.sum

Since your development database already has the schema changes from the rebased migrations applied, mark them as applied to avoid re-execution:

atlas migrate set 006 --url "mysql://root:pass@localhost:3306/development"
Side Effect

Using atlas migrate set will update the atlas_schema_revisions table to mark migrations as applied without actually executing them. This can cause inconsistencies in the revision history.

Step 5: Deploy the changes

Update the PR and deploy the changes:

  • With CI/CD setup: Wait for Atlas CI to pass, then merge the changes. The rebased migrations will be applied automatically during deployment.
  • Without CI/CD setup: Manually apply the rebased migrations to your production database after merging:
atlas migrate apply --url "mysql://root:pass@aws-rds:3306/production"
Simpler Alternative for Local Development

Working with a local development database? Here's a shortcut that can save you some steps! Instead of the careful sync process in Steps 2 and 4, you can just reset your database after rebasing.

Skip Steps 2 and 4 entirely. Just do Step 3: Rebase migrations first, then:

# Clean the dev database and reapply all rebased migrations
atlas schema clean --url "mysql://root:pass@localhost:3306/local"
atlas migrate apply --url "mysql://root:pass@localhost:3306/local"

This method keeps your migration history of the local development database consistent with the production database.

Further Reading

Handling drift between my schema and the atlas_schema_revisions table

Question

My revisions table lists the following versions:

mysql> SELECT * FROM  "atlas_schema_revisions";
+-------------------------+---------+-----+
| version | applied | ... |
+-------------------------+---------+-----+
| .atlas_cloud_identifier | 0 | |
| 20251007053111 | 1 | |
| 20251007051222 | 1 | |
| 20250618084333 | 1 | |
+-------------------------+---------+-----+

However, when I inspect the target database, the schema changes from 20250618084333 were never applied. How can I delete the latest row(s) so the revision history reflects the actual state?

Answer

Use the atlas migrate set command to reset the recorded version to the last state that truly matches the database. For example:

atlas migrate set 20251007051222 \
--url "postgres://user:pass@localhost:5432/app"

This removes every row whose version is greater than 20251007051222 from the revision table. After the command finishes, the latest recorded version is 20251007051222:

mysql> SELECT * FROM  "atlas_schema_revisions";
+-------------------------+---------+-----+
| version | applied | ... |
+-------------------------+---------+-----+
| .atlas_cloud_identifier | 0 | |
| 20251007053111 | 1 | |
| 20251007051222 | 1 | |
+-------------------------+---------+-----+
Only edits metadata

atlas migrate set updates the revision table only. It does not run or roll back SQL statements. Use it exclusively to fix situations where the revision table is ahead of the real schema.

When to use atlas migrate set vs atlas migrate down

Use atlas migrate set when:

  • You are certain that the database schema already matches the version you are setting.
  • You encounter an unexpected state during development and want to realign the revision table with the actual schema.

If the statements from the latest version(s) were in fact executed and must be reverted, run atlas migrate down instead. This command computes a safe downgrade plan that undoes the schema changes and updates the revision history. Using atlas migrate set alone in this case would hide applied changes and leave the database inconsistent.

After resetting the revision table, rerun atlas migrate apply when you are ready so the skipped migration can be applied once the underlying issue is resolved.

Encoding for Atlas' schema files

Question

What encoding is used by Atlas for schema files? How do you avoid encoding issues with PowerShell on Windows?

Answer

Atlas uses UTF-8 to encode schema files and migration files generated by Atlas. UTF-8 is the default encoding on nearly all system terminals, but on Windows, PowerShell uses UTF-16 by default. This can cause an encoding issue when Atlas loads the schema files generated by the inspect command.

For example, running the following command in PowerShell will create the schema.sql file with UTF-16 encoding:

atlas schema inspect -u <URL> > schema.sql

When loading this file for another command, like atlas migrate apply, this will lead to an error because Atlas expects UTF-8 encoding:

Error: schema.sql:1: Error 1064 (42000): You have an error in your SQL syntax; check the manual that corresponds to your MySQL server version for the right syntax to use near '' at line 1

The same problem happens with the external_schema datasource:

data "external_schema" "gorm" {
program = [
"go",
"run",
"-mod=mod",
"ariga.io/atlas-provider-gorm",
"load",
"--path", "./path/to/models",
"--dialect", "postgres", // | mysql | sqlite | sqlserver
]
}

You will get the following error because the output from program is in UTF-16 encoding:

Error: data.external_schema.gorm: running program C:\\Program Files\\Go\\bin\\go.exe: 13:49: illegal character U+0073 's' in escape sequence (and 6 more errors)
exit status 1

To prevent these errors, we recommend changing the default encoding of PowerShell on Windows to UTF-8 by creating a default profile.

Create or edit your PowerShell profile to set the default encoding to UTF-8. For most users, this is done at the $PROFILE location (typically $HOME\Documents\WindowsPowerShell\Microsoft.PowerShell_profile.ps1). This does not require administrator privileges and only affects your user account.

If you want to set the encoding for all users (requires administrator privileges), you can create or edit the profile at the $PSHOME location (typically found at C:\Windows\System32\WindowsPowerShell\v1.0). See Microsoft's documentation for more details.

Add the following content to your profile file:

$PSDefaultParameterValues['Out-File:Encoding'] = 'utf8'
$PSDefaultParameterValues['*:Encoding'] = 'utf8'

After creating the profile, restart all Terminal apps by closing and reopening them. Then, run $PSDefaultParameterValues['Out-File:Encoding'] to confirm that the default encoding has been updated:

$ $PSDefaultParameterValues['Out-File:Encoding']
utf8
$ $PSDefaultParameterValues['*:Encoding']
utf8

Seeding your database with data

Applications often rely on a static dataset to pre-exist in the database in order to function. Examples for such datasets include user roles, country names, or product categories.

The process of populating the database with this initial data is called "seeding". This guide will show you how to seed your database using Atlas.