Automatic Snowflake Schema Migrations with Atlas
Snowflake is a cloud-based data warehousing platform that provides a SQL interface for executing queries, along with robust data management capabilities. It offers unique features like separation of storage and compute, zero-copy cloning, and secure data sharing.
Managing database schemas in Snowflake across different environments can be challenging, especially when coordinating changes across multiple teams and applications. Traditional approaches often involve manual SQL scripts that are difficult to track, test, and roll back.
Enter: Atlas
Atlas helps developers manage their database schema as code, abstracting away the intricacies of database schema management. With Atlas, users provide the desired state of the database schema and Atlas automatically plans the required migrations.
In this guide, we will dive into setting up Atlas for Snowflake schema migration using the declarative workflow.
Snowflake is only available on the Pro plan or during a Trial. Upgrade your plan to get started.
Prerequisites
- Docker
- Snowflake account with administrator access
- SnowSQL installed (see below)
- Atlas installed on your machine
Installing SnowSQL
The SnowSQL provides a convenient way to interact with your Snowflake Platform. Let's install it: see the official SnowSQL documentation.
While we reference SnowSQL in this guide for executing DDL statements, it's not strictly required. You can alternatively use Snowflake's web interface (Worksheets) or any other compatible SQL client to perform the same operations on your Snowflake instance.
Installing Atlas
- macOS + Linux
- Docker
- Windows
To download and install the custom release of the Atlas CLI, simply run the following in your terminal:
curl -sSf https://atlasgo.sh | ATLAS_FLAVOR="snowflake" sh
To pull the Atlas image and run it as a Docker container:
docker pull arigaio/atlas:latest-extended
docker run --rm arigaio/atlas:latest-extended --help
If the container needs access to the host network or a local directory, use the --net=host flag and mount the desired
directory:
docker run --rm --net=host \
  -v $(pwd)/migrations:/migrations \
  arigaio/atlas:latest-extended migrate apply \
  --url "oracle://PDBADMIN:Pssw0rd0995@localhost:1521/FREEPDB1"
Download the custom release and move the atlas binary to a file location on your system PATH.
Setting Up SnowSQL connection
First, configure and connect to your Snowflake account:
- Create
~/.snowsql/configfile with the following content:
- Login via Username / Password
- Login via Programmatic Access Token
- Login via Other Methods
[connections.demo]
account = "<your_account_identifier>"
user = "<your_username>"
password = "<your_password>"
<your_username>: Your Snowflake username<your_password>: Your Snowflake password<your_account_identifier>: Your Snowflake account identifier (found under Avatar → Connect a tool to Snowflake → Account Identifier)
[connections.demo]
account = "<your_account_identifier>"
user = "<your_username>"
password = "<your_access_token>" # Use your programmatic access token
<your_username>: Your Snowflake account username.<your_access_token>: Your Snowflake Programmatic Access Token (found under Avatar → Settings → Authentication → Programmatic Access Tokens)<your_account_identifier>: Your Snowflake account identifier (found under Avatar → Connect a tool to Snowflake → Account Identifier)
You can also connect to Snowflake using other methods, such as OAuth or SSO. For more information, see the Snowflake documentation.
- Test the connection using the SnowSQL CLI:
snowsql -c demo -q "SELECT 1"
The results will look like this:
* SnowSQL * v1.4.3
Type SQL statements or !help
+---+
| 1 |
|---|
| 1 |
+---+
1 Row(s) produced. Time Elapsed: 0.320s
Setting up Environment variables
Though out this guide, we will use the following environment variables to simplify our commands:
export SNOWFLAKE_USER="<your_username>"
export SNOWFLAKE_ACCOUNT="<your_account_identifier>"
export SNOWFLAKE_PASSWORD="<your_password|access_token>"
export SNOWFLAKE_WAREHOUSE="<your_warehouse>"
To get these values, running the following command:
- SnowSQL CLI
- Snowflake Worksheets
To get username:
snowsql -c demo -q "SELECT CURRENT_USER()"
To get account identifier:
snowsql -c demo -q "SELECT CURRENT_ORGANIZATION_NAME() || '-' || CURRENT_ACCOUNT_NAME();"
To get warehouse:
snowsql -c demo -q "SELECT CURRENT_WAREHOUSE()"
To get access token: Navigating to Avatar → Settings → Authentication → Programmatic Access Tokens
To get username:
SELECT CURRENT_USERNAME();
To get account identifier:
SELECT CURRENT_ORGANIZATION_NAME() || '-' || CURRENT_ACCOUNT_NAME();
To get warehouse:
SELECT CURRENT_WAREHOUSE();
To get access token: Navigating to Avatar → Settings → Authentication → Programmatic Access Tokens
Inspecting the Schema
The atlas schema inspect command supports reading the database description provided by a URL and outputting it in
different formats, including Atlas DDL (default), SQL, and JSON. In this guide, we will
demonstrate the flow using both the Atlas DDL and SQL formats.
First, create a database, schema, and a users table:
- SnowSQL CLI
- Snowflake Worksheets
# Create database, schema, and users table
snowsql -c demo -q "CREATE DATABASE MY_DATABASE;
CREATE TABLE MY_DATABASE.PUBLIC.USERS (
  ID INT NOT NULL,
  EMAIL VARCHAR(255),
  DISPLAY_NAME VARCHAR(255)
)"
-- Create database
CREATE DATABASE MY_DATABASE;

-- Create users table in default schema
CREATE TABLE MY_DATABASE.PUBLIC.USERS (
  ID INT NOT NULL,
  EMAIL VARCHAR(255),
  DISPLAY_NAME VARCHAR(255)
);
Next, let's inspect the schema of our Snowflake database using the atlas schema inspect command.
This command will connect to the database and output its schema in the desired format.
- Atlas DDL (HCL)
- SQL
To inspect our Snowflake database, use the -u flag and write the output to a file named schema.hcl:
The -u flag requires a connection URL in the format snowflake://<username>:<password>@<account_identifier>/MY_DATABASE?warehouse=MY_WAREHOUSE.
To understand the URL format, refer to our URL documentation.
- Login via Username / Password
- Login via Programmatic Access Token
atlas schema inspect -u "snowflake://$SNOWFLAKE_USER:$SNOWFLAKE_PASSWORD@$SNOWFLAKE_ACCOUNT/MY_DATABASE?warehouse=$SNOWFLAKE_WAREHOUSE" > schema.hcl
atlas schema inspect -u "snowflake://$SNOWFLAKE_USER:$ACCESS_TOKEN@$SNOWFLAKE_ACCOUNT/MY_DATABASE?warehouse=$SNOWFLAKE_WAREHOUSE" > schema.hcl
Open the schema.hcl file to view the Atlas schema that describes our database.
schema "PUBLIC" {
  retention_time = 1
}
table "USERS" {
  schema         = schema.PUBLIC
  retention_time = 1
  column "ID" {
    null = false
    type = NUMBER(38)
  }
  column "EMAIL" {
    null = true
    type = VARCHAR(255)
  }
  column "DISPLAY_NAME" {
    null = true
    type = VARCHAR(255)
  }
}
To inspect our Snowflake database, use the -u flag and write the output to a file named schema.sql:
- Login via Username / Password
- Login via Programmatic Access Token
atlas schema inspect -u "snowflake://$SNOWFLAKE_USER:$SNOWFLAKE_PASSWORD@$SNOWFLAKE_ACCOUNT/MY_DATABASE?warehouse=$SNOWFLAKE_WAREHOUSE" \
--format '{{ sql . }}' > schema.sql
atlas schema inspect -u "snowflake://$SNOWFLAKE_USER:$ACCESS_TOKEN@$SNOWFLAKE_ACCOUNT/MY_DATABASE?warehouse=$SNOWFLAKE_WAREHOUSE" \
--format '{{ sql . }}' > schema.sql
Open the schema.sql file to view the inspected SQL schema that describes our database.
-- Create "PUBLIC" schema
CREATE SCHEMA IF NOT EXISTS "PUBLIC" DATA_RETENTION_TIME_IN_DAYS = 1;
-- Create "USERS" table
CREATE TABLE "PUBLIC"."USERS" (
  "ID" NUMBER NOT NULL,
  "EMAIL" VARCHAR(255) NULL,
  "DISPLAY_NAME" VARCHAR(255) NULL
) DATA_RETENTION_TIME_IN_DAYS = 1;
For in-depth details on the atlas schema inspect command, covering aspects like inspecting specific schemas,
handling multiple schemas concurrently, excluding tables, and more, refer to our documentation
here.
Declarative Migrations
Atlas supports a workflow called declarative schema migrations. In this workflow, you first define the desired state of your database schema (in one of many supported formats and languages). Then, you let Atlas calculate the diff between the desired state and the actual state of your database. Atlas then generates the SQL commands that will bring your database to the desired state.
Let's see this in action.
First create a new database and dev-database in Snowflake:
- SnowSQL CLI
- Snowflake Worksheets
snowsql -c demo -q "CREATE DATABASE DECLARATIVE";
snowsql -c demo -q "CREATE DATABASE DECLARATIVE_DEVDB";
CREATE DATABASE DECLARATIVE;
CREATE DATABASE DECLARATIVE_DEVDB;
Second, create the schema.sql. This file will contain the desired state of our database in plain SQL.
-- Create "PUBLIC" schema
CREATE SCHEMA IF NOT EXISTS "PUBLIC" DATA_RETENTION_TIME_IN_DAYS = 1;
-- Create "USERS" table
CREATE TABLE "PUBLIC"."USERS" (
  "ID" NUMBER NOT NULL,
  "EMAIL" VARCHAR(255) NULL,
  "DISPLAY_NAME" VARCHAR(255) NULL
) DATA_RETENTION_TIME_IN_DAYS = 1;
-- Create the posts table
CREATE TABLE "PUBLIC"."POSTS" (
  "ID" NUMBER NOT NULL,
  "TITLE" VARCHAR(255) NULL,
  "BODY" VARCHAR(255) NULL,
  "AUTHOR_ID" NUMBER NULL
);
Applying our schema
Next, let's apply this schema to our database using the atlas schema apply command.
atlas schema apply -u "snowflake://$SNOWFLAKE_USER:$SNOWFLAKE_PASSWORD@$SNOWFLAKE_ACCOUNT/DECLARATIVE?warehouse=$SNOWFLAKE_WAREHOUSE" \
  --to file://schema.sql \
  --dev-url "snowflake://$SNOWFLAKE_USER:$SNOWFLAKE_PASSWORD@$SNOWFLAKE_ACCOUNT/DECLARATIVE_DEVDB?warehouse=$SNOWFLAKE_WAREHOUSE"
Atlas will connect to our target database to inspect its current state. Next, it will use the dev-database to normalize our schema and generate the SQL commands that will bring our database to the desired state:
Planning migration statements (2 in total):

  -- create "posts" table:
    -> CREATE TABLE "PUBLIC"."POSTS" (
         "ID" NUMBER NOT NULL,
         "TITLE" VARCHAR(255) NULL,
         "BODY" VARCHAR(255) NULL,
         "AUTHOR_ID" NUMBER NULL
       ) DATA_RETENTION_TIME_IN_DAYS = 1;
  -- create "users" table:
    -> CREATE TABLE "PUBLIC"."USERS" (
         "ID" NUMBER NOT NULL,
         "EMAIL" VARCHAR(255) NULL,
         "DISPLAY_NAME" VARCHAR(255) NULL
       ) DATA_RETENTION_TIME_IN_DAYS = 1;

-------------------------------------------

Analyzing planned statements (2 in total):

  -- no diagnostics found

  -------------------------
  -- 12.782636916s
  -- 2 schema changes

-------------------------------------------

? Approve or abort the plan:
  ▸ Approve and apply
    Abort
After applying the schema, Atlas confirms that the changes were applied:
-------------------------------------------

Analyzing planned statements (2 in total):

  -- no diagnostics found

  -------------------------
  -- 12.782636916s
  -- 2 schema changes

-------------------------------------------

Applying approved migration (2 statements in total):

  -- create "posts" table
    -> CREATE TABLE "PUBLIC"."POSTS" (
         "ID" NUMBER NOT NULL,
         "TITLE" VARCHAR(255) NULL,
         "BODY" VARCHAR(255) NULL,
         "AUTHOR_ID" NUMBER NULL
       ) DATA_RETENTION_TIME_IN_DAYS = 1;
  -- ok (415.931208ms)

  -- create "users" table
    -> CREATE TABLE "PUBLIC"."USERS" (
         "ID" NUMBER NOT NULL,
         "EMAIL" VARCHAR(255) NULL,
         "DISPLAY_NAME" VARCHAR(255) NULL
       ) DATA_RETENTION_TIME_IN_DAYS = 1;
  -- ok (1.228802041s)

  -------------------------
  -- 1.644953333s
  -- 1 migration
  -- 2 sql statements
Next, let's re-run the atlas schema apply command. This time, Atlas will detect that the database is
already in the desired state and will not generate any changes:
Schema is synced, no changes to be made
Altering our schema
Now, let's make some changes to our schema. Open the schema.sql file and add a new column to the users table:
-- Create "PUBLIC" schema
CREATE SCHEMA IF NOT EXISTS "PUBLIC" DATA_RETENTION_TIME_IN_DAYS = 1;
-- Create "USERS" table
CREATE TABLE "PUBLIC"."USERS" (
  "ID" NUMBER NOT NULL,
  "EMAIL" VARCHAR(255) NULL,
+ "BIO" VARCHAR(1024) NULL,  -- New column added
  "DISPLAY_NAME" VARCHAR(255) NULL
) DATA_RETENTION_TIME_IN_DAYS = 1;
-- Create the posts table
CREATE TABLE "PUBLIC"."POSTS" (
  "ID" NUMBER NOT NULL,
  "TITLE" VARCHAR(255) NULL,
  "BODY" VARCHAR(255) NULL,
  "AUTHOR_ID" NUMBER NULL
);
Next, let's re-run the atlas schema apply command. This time, Atlas will detect that the schema has changed
and will generate the needed SQL commands to bring the database to the desired state:
Planning migration statements (1 in total):

  -- modify "users" table to add "bio" column:
    -> ALTER TABLE "PUBLIC"."USERS" ADD COLUMN "BIO" VARCHAR(1024) NULL;

-------------------------------------------

Analyzing planned statements (1 in total):

  -- no diagnostics found

  -------------------------
  -- 5.926997708s
  -- 1 schema change

-------------------------------------------

? Approve or abort the plan:
  ▸ Approve and apply
    Abort
After applying the changes, Atlas confirms once again that the changes were applied:
-------------------------------------------

Applying approved migration (1 statement in total):

  -- modify "users" table to add "bio" column
    -> ALTER TABLE "PUBLIC"."USERS" ADD COLUMN "BIO" VARCHAR(1024) NULL;
  -- ok (387.135459ms)

  -------------------------
  -- 387.207792ms
  -- 1 migration
  -- 1 sql statement
Visualizing our schema
One of the most useful features of Atlas is the ability to visualize your database schema. To do so, run the
atlas schema inspect command with the -w (web) flag:
atlas schema inspect -w -u "snowflake://$SNOWFLAKE_USER:$SNOWFLAKE_PASSWORD@$SNOWFLAKE_ACCOUNT/DECLARATIVE?warehouse=$SNOWFLAKE_WAREHOUSE"
Atlas will ask whether you would like to create your visualization publicly (in a publicly accessible URL) or privately (in your Atlas Cloud account):
? Where would you like to share your schema visualization?:
  ▸ Publicly (gh.atlasgo.cloud)
    Privately (youraccount.atlasgo.cloud)
For this demo, let's choose the public option. Atlas will create the visualization and open it in your default browser.
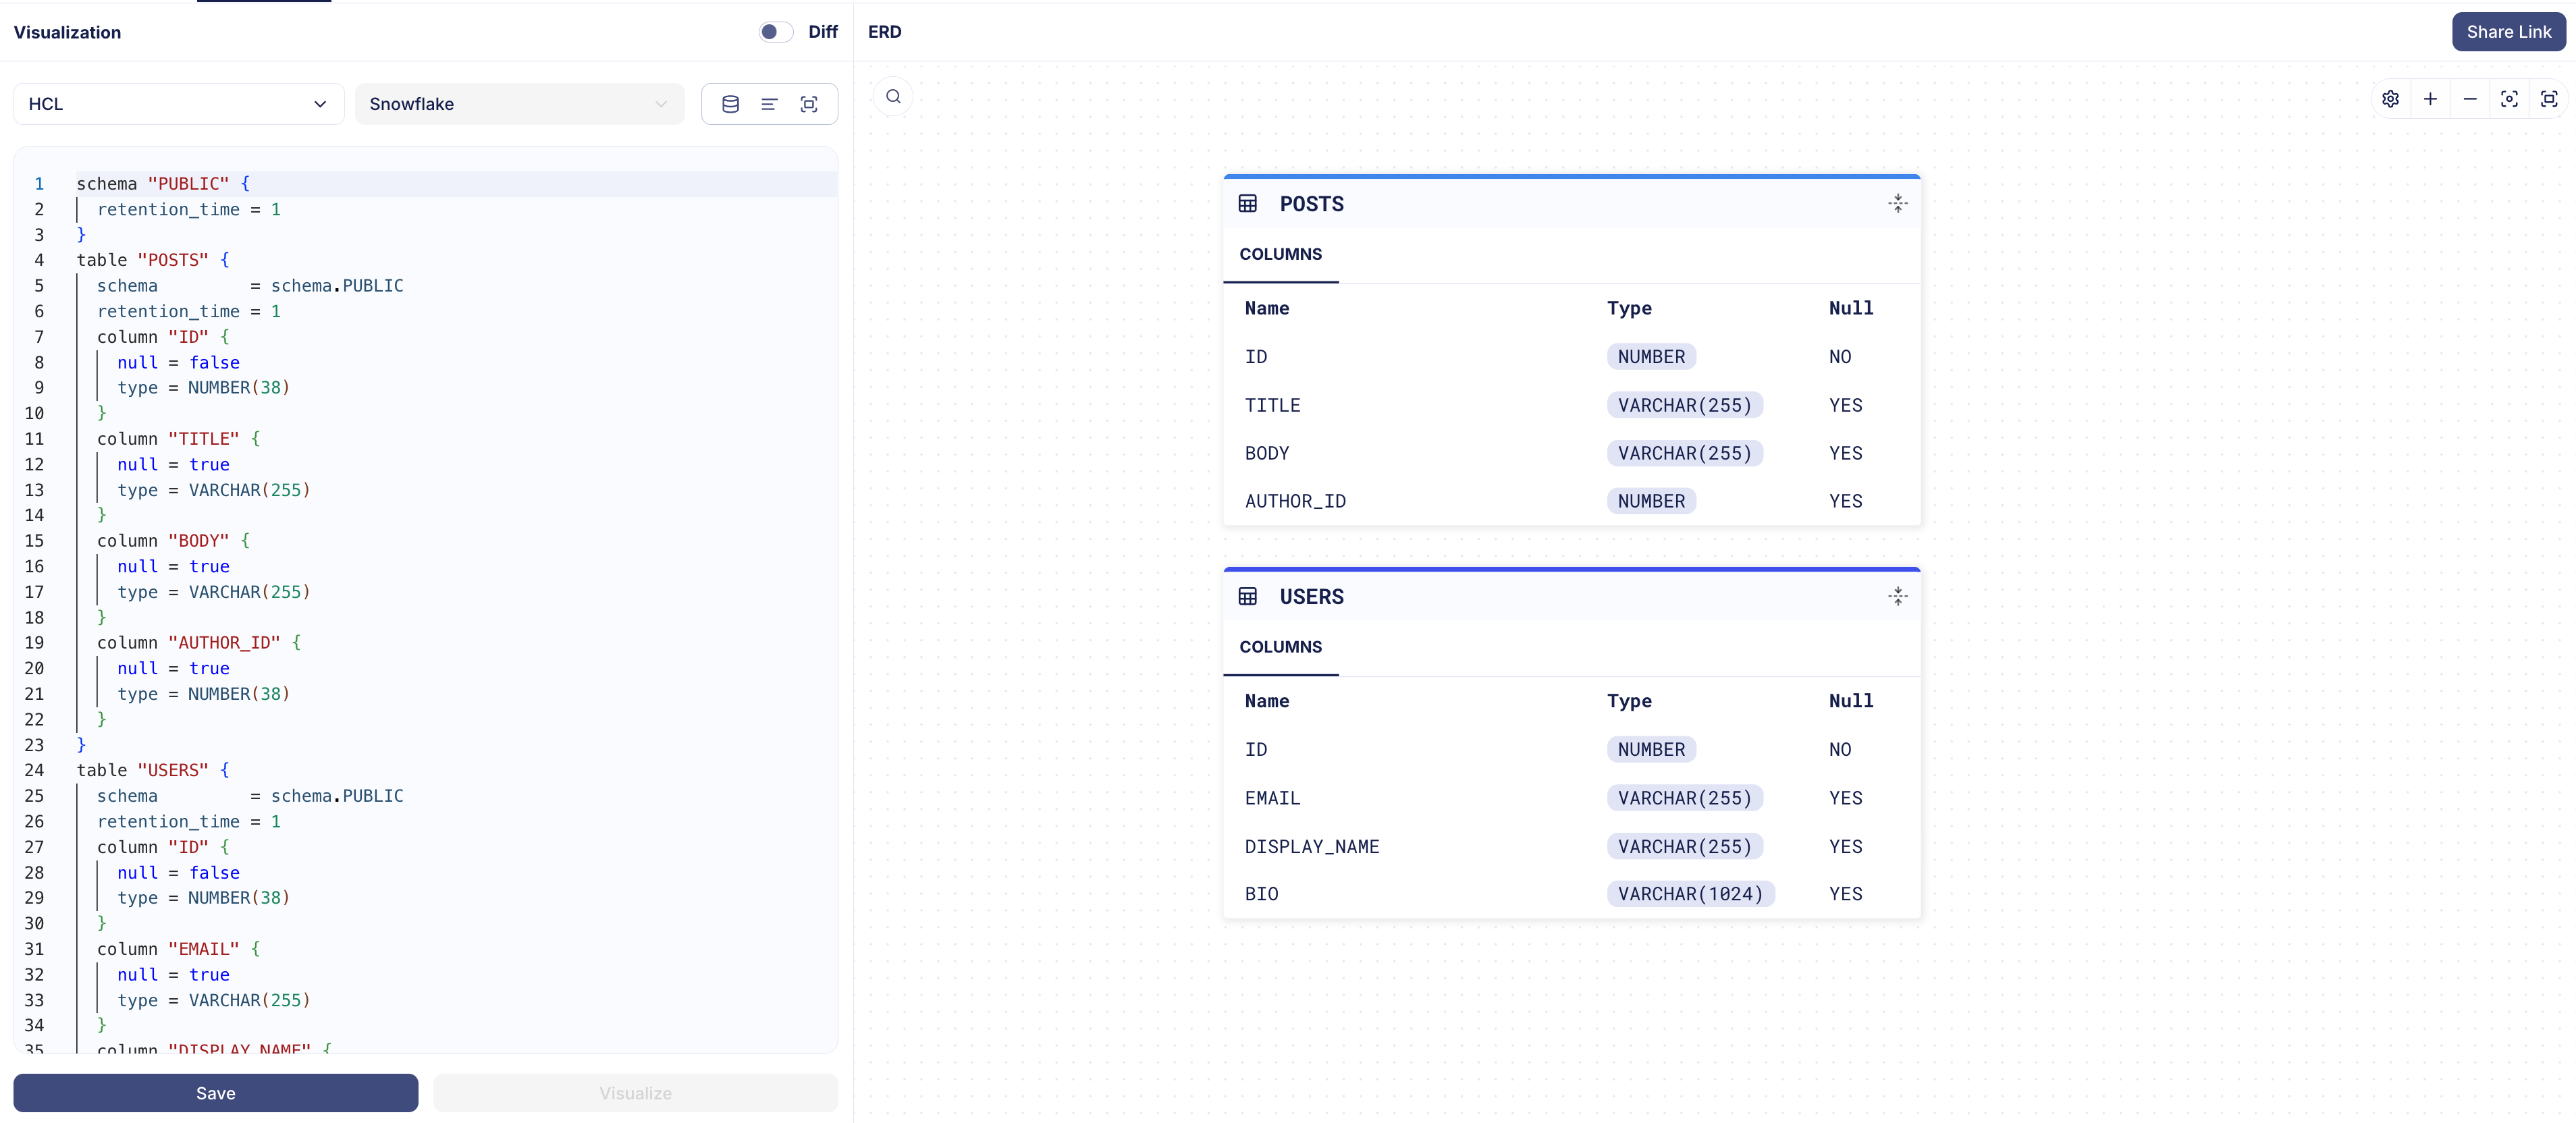
See it for yourself at: https://gh.atlasgo.cloud/explore/cb1382a3
Versioned Migrations
In addition to the declarative workflow, Atlas also supports versioned migrations, which are useful when you need more control over how schema changes are applied.
Creating a migration directory
First create a new database in Snowflake for this demo:
- SnowSQL CLI
- Snowflake Worksheets
snowsql -c demo -q "CREATE DATABASE VERSIONED";
CREATE DATABASE VERSIONED;
Then run the following command to create a new migration file:
atlas migrate new create_comments_table --edit
This will create a new migration file in the migrations directory. Open the file and add the SQL needed to
create a comments table:
-- Create "comments" table
CREATE TABLE PUBLIC.COMMENTS (
  ID INT NOT NULL,
  POST_ID INT NOT NULL,
  USER_ID INT NOT NULL,
  CONTENT TEXT,
  CREATED_AT TIMESTAMP
);
Applying the migration
Now, let's apply this migration to our database:
atlas migrate apply \
  --url "snowflake://$SNOWFLAKE_USER:$SNOWFLAKE_PASSWORD@$SNOWFLAKE_ACCOUNT/VERSIONED?warehouse=$SNOWFLAKE_WAREHOUSE" \
  --dir "file://migrations"
Atlas will apply the migration and confirm that it was successful:
Migrating to version 20250715092849 (1 migrations in total):

  -- migrating version 20250715092849
    -> CREATE TABLE COMMENTS (
         ID INT NOT NULL,
         POST_ID INT NOT NULL,
         USER_ID INT NOT NULL,
         CONTENT TEXT,
         CREATED_AT TIMESTAMP
       );
  -- ok (5.722020458s)

  -------------------------
  -- 16.864460291s
  -- 1 migration
  -- 1 sql statement
Wrapping up
In this guide we have demonstrated how to set up Atlas to manage your Snowflake database schema. We have shown how to use both declarative and versioned migration workflows to manage your schema changes. These features are just the beginning of what Atlas can do to help you better manage your database!
To learn more about Atlas capabilities, check out the Atlas documentation.
As always, we would love to hear your feedback and suggestions on our Discord server.