Getting Started with Atlas
Atlas is a language-independent tool for managing and migrating database schemas using modern DevOps principles. Define your desired schema, and Atlas will plan, lint, test, and safely apply the changes - like Terraform, but for databases. This guide takes about 5 minutes.
If you're using Claude Code, Cursor, GitHub Copilot, Codex, or any AI agent that can run CLI commands - let it handle the setup. After installing Atlas (Step 1 below), tell your agent:
Set up Atlas for database schema management in this project.
Read https://atlasgo.io/guides/ai-tools for setup instructions.
Your agent will read the guide, install the Atlas skill, and configure your project.
Step 1: Install Atlas
- macOS + Linux
- Homebrew
- Docker
- Windows
- CI
- Manual Installation
To download and install the latest release of the Atlas CLI, simply run the following in your terminal:
curl -sSf https://atlasgo.sh | sh
Get the latest release with Homebrew:
brew install ariga/tap/atlas
To pull the Atlas image and run it as a Docker container:
docker pull arigaio/atlas
docker run --rm arigaio/atlas --help
If the container needs access to the host network or a local directory, use the --net=host flag and mount the desired
directory:
docker run --rm --net=host \
  -v $(pwd)/migrations:/migrations \
  arigaio/atlas migrate apply \
  --url "mysql://root:pass@:3306/test"
Download the latest release and move the atlas binary to a file location on your system PATH.
GitHub Actions
Use the setup-atlas action to install Atlas in your GitHub Actions workflow:
- uses: ariga/setup-atlas@v0
  with:
    cloud-token: ${{ secrets.ATLAS_CLOUD_TOKEN }}
Other CI Platforms
For other CI/CD platforms, use the installation script. See the CI/CD integrations for more details.
Step 2: Log In (Recommended)
Log in to unlock Atlas Pro features such as migration linting, testing, schema visualization, and CI/CD integration:
atlas login
This opens your browser to sign up or log in. You can continue this guide without logging in, but Pro features will be unavailable.
Step 3: Define Your Schema
Create a file called schema.sql. This is your desired database schema - Atlas reads it and
figures out what needs to change.
- PostgreSQL
- MySQL
- SQL Server
- ClickHouse
- SQLite
CREATE TABLE users (
  id serial PRIMARY KEY,
  name varchar(255) NOT NULL,
  email varchar(255) UNIQUE NOT NULL,
  created_at timestamptz DEFAULT now()
);
CREATE TABLE users (
  id int AUTO_INCREMENT PRIMARY KEY,
  name varchar(255) NOT NULL,
  email varchar(255) NOT NULL UNIQUE,
  created_at timestamp DEFAULT CURRENT_TIMESTAMP
);
CREATE TABLE users (
  id int IDENTITY(1,1) PRIMARY KEY,
  name nvarchar(255) NOT NULL,
  email nvarchar(255) NOT NULL UNIQUE,
  created_at datetimeoffset DEFAULT SYSDATETIMEOFFSET()
);
CREATE TABLE users (
  id UInt64,
  name String,
  email String,
  created_at DateTime DEFAULT now()
) ENGINE = MergeTree()
ORDER BY id;
CREATE TABLE users (
  id integer PRIMARY KEY AUTOINCREMENT,
  name text NOT NULL,
  email text NOT NULL UNIQUE,
  created_at text DEFAULT (datetime('now'))
);
Atlas also supports MariaDB, DSQL, Redshift, Snowflake, Oracle, Spanner, CockroachDB, Databricks, and more.
Step 4: Set Up Your Database
Set your database URL. If you already have a database running, point to it directly. Otherwise, Atlas can spin one up for you using Docker:
- PostgreSQL
- MySQL
- SQL Server
- ClickHouse
- SQLite
# Spin up a local PostgreSQL database (scoped to the public schema)
export DATABASE_URL=$(atlas tool docker --url "docker://postgres/17/myapp?search_path=public" --name my-db)

# Or use an existing database
# export DATABASE_URL="postgres://user:password@localhost:5432/myapp?search_path=public&sslmode=disable"
# Spin up a local MySQL database
export DATABASE_URL=$(atlas tool docker --url "docker://mysql/8/myapp" --name my-db)

# Or use an existing database
# export DATABASE_URL="mysql://root:pass@localhost:3306/myapp"
# Spin up a local SQL Server database
export DATABASE_URL=$(atlas tool docker --url "docker://sqlserver/2022-latest/myapp" --name my-db)

# Or use an existing database
# export DATABASE_URL="sqlserver://sa:P@ssw0rd0995@localhost:1433?database=myapp"
# Spin up a local ClickHouse database
export DATABASE_URL=$(atlas tool docker --url "docker://clickhouse/23.11/myapp" --name my-db)

# Or use an existing database
# export DATABASE_URL="clickhouse://localhost:9000/myapp"
export DATABASE_URL="sqlite://myapp.db"
When you're done, stop the container with atlas tool docker kill --name my-db.
Step 5: Declarative Workflow
The declarative workflow lets you define the desired state of your database schema, and Atlas figures out what needs to change.
Apply the schema
Run atlas schema apply to push your schema.sql to the database. The --dev-url is a disposable
database Atlas uses to compute the diff between your desired and current schema:
- PostgreSQL
- MySQL
- SQL Server
- ClickHouse
- SQLite
atlas schema apply \
  --url "$DATABASE_URL" \
  --to file://schema.sql \
  --dev-url "docker://postgres/17/dev?search_path=public"
atlas schema apply \
  --url "$DATABASE_URL" \
  --to file://schema.sql \
  --dev-url "docker://mysql/8/dev"
atlas schema apply \
  --url "$DATABASE_URL" \
  --to file://schema.sql \
  --dev-url "docker://sqlserver/2022-latest/dev?mode=schema"
atlas schema apply \
  --url "$DATABASE_URL" \
  --to file://schema.sql \
  --dev-url "docker://clickhouse/23.11/dev"
atlas schema apply \
  --url "$DATABASE_URL" \
  --to file://schema.sql \
  --dev-url "sqlite://dev?mode=memory"
Atlas compares the desired state (schema.sql) with the current state of the database,
plans the migration, and asks for confirmation:
- PostgreSQL
- MySQL
- SQL Server
- ClickHouse
- SQLite
Planning migration statements (1 in total):

  -- create "users" table:
    -> CREATE TABLE "users" (
         "id" serial NOT NULL,
         "name" character varying(255) NOT NULL,
         "email" character varying(255) NOT NULL,
         "created_at" timestamptz NULL DEFAULT now(),
         PRIMARY KEY ("id"),
         CONSTRAINT "users_email_key" UNIQUE ("email")
       );

-------------------------------------------

? Approve or abort the plan:
  ▸ Approve and apply
    Abort
Planning migration statements (1 in total):

  -- create "users" table:
    -> CREATE TABLE `users` (
         `id` int NOT NULL AUTO_INCREMENT,
         `name` varchar(255) NOT NULL,
         `email` varchar(255) NOT NULL,
         `created_at` timestamp NULL DEFAULT CURRENT_TIMESTAMP,
         PRIMARY KEY (`id`),
         UNIQUE INDEX `email` (`email`)
       ) CHARSET utf8mb4 COLLATE utf8mb4_0900_ai_ci;

-------------------------------------------

? Approve or abort the plan:
  ▸ Approve and apply
    Abort
Planning migration statements (1 in total):

  -- create "users" table:
    -> CREATE TABLE [users] (
         [id] int IDENTITY (1, 1) NOT NULL,
         [name] nvarchar(255) NOT NULL,
         [email] nvarchar(255) NOT NULL,
         [created_at] datetimeoffset(7) NULL DEFAULT (sysdatetimeoffset()),
         CONSTRAINT [PK_users] PRIMARY KEY ([id]),
         CONSTRAINT [UQ_users_email] UNIQUE ([email])
       );

-------------------------------------------

? Approve or abort the plan:
  ▸ Approve and apply
    Abort
Planning migration statements (1 in total):

  -- create "users" table:
    -> CREATE TABLE `users` (
         `id` UInt64,
         `name` String,
         `email` String,
         `created_at` DateTime DEFAULT now()
       )
       ENGINE = MergeTree
       ORDER BY `id`;

-------------------------------------------

? Approve or abort the plan:
  ▸ Approve and apply
    Abort
Planning migration statements (2 in total):
-- create "users" table:
-> CREATE TABLE `users` (
`id` integer NULL PRIMARY KEY AUTOINCREMENT,
`name` text NOT NULL,
`email` text NOT NULL,
`created_at` text NULL DEFAULT (datetime('now'))
);
-- create index "users_email" to table: "users":
-> CREATE UNIQUE INDEX `users_email` ON `users` (`email`);
-------------------------------------------
? Approve or abort the plan:
�▸ Approve and apply
Abort
Approve, and the table is created. Verify it by inspecting the database:
atlas schema inspect --url "$DATABASE_URL" --format '{{ sql . }}'
- PostgreSQL
- MySQL
- SQL Server
- ClickHouse
- SQLite
-- Create "users" table
CREATE TABLE "users" (
  "id" serial NOT NULL,
  "name" character varying(255) NOT NULL,
  "email" character varying(255) NOT NULL,
  "created_at" timestamptz NULL DEFAULT now(),
  PRIMARY KEY ("id"),
  CONSTRAINT "users_email_key" UNIQUE ("email")
);
-- Create "users" table
CREATE TABLE `users` (
  `id` int NOT NULL AUTO_INCREMENT,
  `name` varchar(255) NOT NULL,
  `email` varchar(255) NOT NULL,
  `created_at` timestamp NULL DEFAULT CURRENT_TIMESTAMP,
  PRIMARY KEY (`id`),
  UNIQUE INDEX `email` (`email`)
) CHARSET utf8mb4 COLLATE utf8mb4_0900_ai_ci;
-- Create "users" table
CREATE TABLE [users] (
  [id] int IDENTITY (1, 1) NOT NULL,
  [name] nvarchar(255) NOT NULL,
  [email] nvarchar(255) NOT NULL,
  [created_at] datetimeoffset(7) NULL DEFAULT (sysdatetimeoffset()),
  CONSTRAINT [PK_users] PRIMARY KEY ([id]),
  CONSTRAINT [UQ_users_email] UNIQUE ([email])
);
-- Create "users" table
CREATE TABLE `users` (
  `id` UInt64,
  `name` String,
  `email` String,
  `created_at` DateTime DEFAULT now()
)
ENGINE = MergeTree
ORDER BY `id`;
-- Create "users" table
CREATE TABLE `users` (
  `id` integer NULL PRIMARY KEY AUTOINCREMENT,
  `name` text NOT NULL,
  `email` text NOT NULL,
  `created_at` text NULL DEFAULT (datetime('now'))
);
-- Create index "users_email" to table: "users"
CREATE UNIQUE INDEX `users_email` ON `users` (`email`);
The table exists. That's the core idea of Atlas automatic migration planning - you define the desired state, Atlas handles the rest.
Make a schema change
Now edit schema.sql to add a blog_posts table:
- PostgreSQL
- MySQL
- SQL Server
- ClickHouse
- SQLite
CREATE TABLE users (
  id serial PRIMARY KEY,
  name varchar(255) NOT NULL,
  email varchar(255) UNIQUE NOT NULL,
  created_at timestamptz DEFAULT now()
);

CREATE TABLE blog_posts (
  id serial PRIMARY KEY,
  title varchar(255) NOT NULL,
  body text,
  author_id int REFERENCES users(id),
  created_at timestamptz DEFAULT now()
);
CREATE TABLE users (
  id int AUTO_INCREMENT PRIMARY KEY,
  name varchar(255) NOT NULL,
  email varchar(255) NOT NULL UNIQUE,
  created_at timestamp DEFAULT CURRENT_TIMESTAMP
);

CREATE TABLE blog_posts (
  id int AUTO_INCREMENT PRIMARY KEY,
  title varchar(255) NOT NULL,
  body text,
  author_id int,
  created_at timestamp DEFAULT CURRENT_TIMESTAMP,
  CONSTRAINT author_fk FOREIGN KEY (author_id) REFERENCES users(id)
);
CREATE TABLE users (
  id int IDENTITY(1,1) PRIMARY KEY,
  name nvarchar(255) NOT NULL,
  email nvarchar(255) NOT NULL UNIQUE,
  created_at datetimeoffset DEFAULT SYSDATETIMEOFFSET()
);

CREATE TABLE blog_posts (
  id int IDENTITY(1,1) PRIMARY KEY,
  title nvarchar(255) NOT NULL,
  body nvarchar(max),
  author_id int REFERENCES users(id),
  created_at datetimeoffset DEFAULT SYSDATETIMEOFFSET()
);
CREATE TABLE users (
  id UInt64,
  name String,
  email String,
  created_at DateTime DEFAULT now()
) ENGINE = MergeTree()
ORDER BY id;

CREATE TABLE blog_posts (
  id UInt64,
  title String,
  body String,
  author_id UInt64,
  created_at DateTime DEFAULT now()
) ENGINE = MergeTree()
ORDER BY id;
CREATE TABLE users (
  id integer PRIMARY KEY AUTOINCREMENT,
  name text NOT NULL,
  email text NOT NULL UNIQUE,
  created_at text DEFAULT (datetime('now'))
);

CREATE TABLE blog_posts (
  id integer PRIMARY KEY AUTOINCREMENT,
  title text NOT NULL,
  body text,
  author_id integer REFERENCES users(id),
  created_at text DEFAULT (datetime('now'))
);
Apply schema changes
Run atlas schema apply again (same command as before). Atlas detects that users already exists and
only creates what's new - the blog_posts table:
- PostgreSQL
- MySQL
- SQL Server
- ClickHouse
- SQLite
Planning migration statements (1 in total):

  -- create "blog_posts" table:
    -> CREATE TABLE "blog_posts" (
         "id" serial NOT NULL,
         "title" character varying(255) NOT NULL,
         "body" text NULL,
         "author_id" integer NULL,
         "created_at" timestamptz NULL DEFAULT now(),
         PRIMARY KEY ("id"),
         CONSTRAINT "blog_posts_author_id_fkey" FOREIGN KEY ("author_id") REFERENCES "users" ("id") ON UPDATE NO ACTION ON DELETE NO ACTION
       );

-------------------------------------------

? Approve or abort the plan:
  ▸ Approve and apply
    Abort
Planning migration statements (1 in total):

  -- create "blog_posts" table:
    -> CREATE TABLE `blog_posts` (
         `id` int NOT NULL AUTO_INCREMENT,
         `title` varchar(255) NOT NULL,
         `body` text NULL,
         `author_id` int NULL,
         `created_at` timestamp NULL DEFAULT CURRENT_TIMESTAMP,
         PRIMARY KEY (`id`),
         INDEX `author_fk` (`author_id`),
         CONSTRAINT `author_fk` FOREIGN KEY (`author_id`) REFERENCES `users` (`id`) ON UPDATE NO ACTION ON DELETE NO ACTION
       ) CHARSET utf8mb4 COLLATE utf8mb4_0900_ai_ci;

-------------------------------------------

? Approve or abort the plan:
  ▸ Approve and apply
    Abort
Planning migration statements (1 in total):

  -- create "blog_posts" table:
    -> CREATE TABLE [blog_posts] (
         [id] int IDENTITY (1, 1) NOT NULL,
         [title] nvarchar(255) NOT NULL,
         [body] nvarchar(max) NULL,
         [author_id] int NULL,
         [created_at] datetimeoffset(7) NULL DEFAULT (sysdatetimeoffset()),
         CONSTRAINT [PK_blog_posts] PRIMARY KEY ([id]),
         CONSTRAINT [blog_posts_author_id_fkey] FOREIGN KEY ([author_id]) REFERENCES [users] ([id])
       );

-------------------------------------------

? Approve or abort the plan:
  ▸ Approve and apply
    Abort
Planning migration statements (1 in total):

  -- create "blog_posts" table:
    -> CREATE TABLE `blog_posts` (
         `id` UInt64,
         `title` String,
         `body` String,
         `author_id` UInt64,
         `created_at` DateTime DEFAULT now()
       )
       ENGINE = MergeTree
       ORDER BY `id`;

-------------------------------------------

? Approve or abort the plan:
  ▸ Approve and apply
    Abort
Planning migration statements (1 in total):

  -- create "blog_posts" table:
    -> CREATE TABLE `blog_posts` (
         `id` integer NULL PRIMARY KEY AUTOINCREMENT,
         `title` text NOT NULL,
         `body` text NULL,
         `author_id` integer NULL,
         `created_at` text NULL DEFAULT (datetime('now')),
         CONSTRAINT `0` FOREIGN KEY (`author_id`) REFERENCES `users` (`id`) ON UPDATE NO ACTION ON DELETE NO ACTION
       );

-------------------------------------------

? Approve or abort the plan:
  ▸ Approve and apply
    Abort
Atlas automatically computes the diff between your desired and current schema - you edit the schema, Atlas generates the migration.
Read more about the Declarative Workflow and Pre-planning Migrations for production deployments.
Step 6: Versioned Workflow
For teams that want migration files checked into version control, reviewed in PRs, and applied in CI/CD, Atlas can generate them automatically from your schema.
The commands below assume the default migration directory (file://migrations).
If your project uses a different directory, pass --dir "file://<your-migrations-dir>" to the commands below.
Generate the first migration
Your schema.sql already has both tables from Step 5. Generate the initial migration:
- PostgreSQL
- MySQL
- SQL Server
- ClickHouse
- SQLite
atlas migrate diff initial \
  --to file://schema.sql \
  --dev-url "docker://postgres/17/dev?search_path=public"
atlas migrate diff initial \
  --to file://schema.sql \
  --dev-url "docker://mysql/8/dev"
atlas migrate diff initial \
  --to file://schema.sql \
  --dev-url "docker://sqlserver/2022-latest/dev?mode=schema"
atlas migrate diff initial \
  --to file://schema.sql \
  --dev-url "docker://clickhouse/23.11/dev"
atlas migrate diff initial \
  --to file://schema.sql \
  --dev-url "sqlite://dev?mode=memory"
Atlas creates a migrations/ directory with the generated SQL file and a checksum file:
migrations/
├── 20260215120000_initial.sql
└── atlas.sum
- PostgreSQL
- MySQL
- SQL Server
- ClickHouse
- SQLite
-- Create "users" table
CREATE TABLE "users" (
  "id" serial NOT NULL,
  "name" character varying(255) NOT NULL,
  "email" character varying(255) NOT NULL,
  "created_at" timestamptz NULL DEFAULT now(),
  PRIMARY KEY ("id"),
  CONSTRAINT "users_email_key" UNIQUE ("email")
);
-- Create "blog_posts" table
CREATE TABLE "blog_posts" (
  "id" serial NOT NULL,
  "title" character varying(255) NOT NULL,
  "body" text NULL,
  "author_id" integer NULL,
  "created_at" timestamptz NULL DEFAULT now(),
  PRIMARY KEY ("id"),
  CONSTRAINT "blog_posts_author_id_fkey" FOREIGN KEY ("author_id") REFERENCES "users" ("id") ON UPDATE NO ACTION ON DELETE NO ACTION
);
-- Create "users" table
CREATE TABLE `users` (
  `id` int NOT NULL AUTO_INCREMENT,
  `name` varchar(255) NOT NULL,
  `email` varchar(255) NOT NULL,
  `created_at` timestamp NULL DEFAULT CURRENT_TIMESTAMP,
  PRIMARY KEY (`id`),
  UNIQUE INDEX `email` (`email`)
) CHARSET utf8mb4 COLLATE utf8mb4_0900_ai_ci;
-- Create "blog_posts" table
CREATE TABLE `blog_posts` (
  `id` int NOT NULL AUTO_INCREMENT,
  `title` varchar(255) NOT NULL,
  `body` text NULL,
  `author_id` int NULL,
  `created_at` timestamp NULL DEFAULT CURRENT_TIMESTAMP,
  PRIMARY KEY (`id`),
  INDEX `author_fk` (`author_id`),
  CONSTRAINT `author_fk` FOREIGN KEY (`author_id`) REFERENCES `users` (`id`) ON UPDATE NO ACTION ON DELETE NO ACTION
) CHARSET utf8mb4 COLLATE utf8mb4_0900_ai_ci;
-- Create "users" table
CREATE TABLE [users] (
  [id] int IDENTITY (1, 1) NOT NULL,
  [name] nvarchar(255) NOT NULL,
  [email] nvarchar(255) NOT NULL,
  [created_at] datetimeoffset(7) NULL DEFAULT (sysdatetimeoffset()),
  CONSTRAINT [PK_users] PRIMARY KEY ([id]),
  CONSTRAINT [UQ_users_email] UNIQUE ([email])
);
-- Create "blog_posts" table
CREATE TABLE [blog_posts] (
  [id] int IDENTITY (1, 1) NOT NULL,
  [title] nvarchar(255) NOT NULL,
  [body] nvarchar(max) NULL,
  [author_id] int NULL,
  [created_at] datetimeoffset(7) NULL DEFAULT (sysdatetimeoffset()),
  CONSTRAINT [PK_blog_posts] PRIMARY KEY ([id]),
  CONSTRAINT [blog_posts_author_id_fkey] FOREIGN KEY ([author_id]) REFERENCES [users] ([id])
);
-- Create "users" table
CREATE TABLE `users` (
  `id` UInt64,
  `name` String,
  `email` String,
  `created_at` DateTime DEFAULT now()
)
ENGINE = MergeTree
ORDER BY `id`;
-- Create "blog_posts" table
CREATE TABLE `blog_posts` (
  `id` UInt64,
  `title` String,
  `body` String,
  `author_id` UInt64,
  `created_at` DateTime DEFAULT now()
)
ENGINE = MergeTree
ORDER BY `id`;
-- Create "users" table
CREATE TABLE `users` (
  `id` integer NULL PRIMARY KEY AUTOINCREMENT,
  `name` text NOT NULL,
  `email` text NOT NULL,
  `created_at` text NULL DEFAULT (datetime('now'))
);
-- Create index "users_email" to table: "users"
CREATE UNIQUE INDEX `users_email` ON `users` (`email`);
-- Create "blog_posts" table
CREATE TABLE `blog_posts` (
  `id` integer NULL PRIMARY KEY AUTOINCREMENT,
  `title` text NOT NULL,
  `body` text NULL,
  `author_id` integer NULL,
  `created_at` text NULL DEFAULT (datetime('now')),
  CONSTRAINT `0` FOREIGN KEY (`author_id`) REFERENCES `users` (`id`) ON UPDATE NO ACTION ON DELETE NO ACTION
);
Lint the migration
Before applying, validate the migration for safety issues (destructive changes, data loss, etc.):
- PostgreSQL
- MySQL
- SQL Server
- ClickHouse
- SQLite
atlas migrate lint \
  --dev-url "docker://postgres/17/dev?search_path=public" \
  --latest 1
Analyzing changes until version 20260215120000 (1 migration in total):

  -- analyzing version 20260215120000
    -- non-optimal columns alignment:
      -- L2: Table "users" has 4 redundant bytes of padding per row. To reduce disk space, the
         optimal order of the columns is as follows: "created_at", "id", "name", "email"
         https://atlasgo.io/lint/analyzers#PG110
  -- ok (563.708µs)

  -------------------------
  -- 115.851ms
  -- 1 version with warnings
  -- 2 schema changes
  -- 1 diagnostic
atlas migrate lint \
  --dev-url "docker://mysql/8/dev" \
  --latest 1
Analyzing changes until version 20260215120000 (1 migration in total):

  -- analyzing version 20260215120000
    -- no diagnostics found
  -- ok (32.827ms)

  -------------------------
  -- 98.872ms
  -- 1 version ok
  -- 2 schema changes
atlas migrate lint \
  --dev-url "docker://sqlserver/2022-latest/dev?mode=schema" \
  --latest 1
Analyzing changes until version 20260215120000 (1 migration in total):

  -- analyzing version 20260215120000
    -- no diagnostics found
  -- ok

  -------------------------
  -- 1 version ok
  -- 2 schema changes
atlas migrate lint \
  --dev-url "docker://clickhouse/23.11/dev" \
  --latest 1
Analyzing changes until version 20260215120000 (1 migration in total):

  -- analyzing version 20260215120000
    -- no diagnostics found
  -- ok

  -------------------------
  -- 1 version ok
  -- 2 schema changes
atlas migrate lint \
  --dev-url "sqlite://dev?mode=memory" \
  --latest 1
Analyzing changes until version 20260215120000 (1 migration in total):

  -- analyzing version 20260215120000
    -- no diagnostics found
  -- ok

  -------------------------
  -- 1 version ok
  -- 3 schema changes
No critical issues - just optimization suggestions for PostgreSQL.
Apply the migration
Since the database already has tables from the declarative workflow in Step 5, clean it first:
atlas schema clean --url "$DATABASE_URL" --auto-approve
Then apply the migration:
- PostgreSQL
- MySQL
- SQL Server
- ClickHouse
- SQLite
atlas migrate apply --url "$DATABASE_URL"
Migrating to version 20260215120000 (1 migrations in total):

  -- migrating version 20260215120000
    -> CREATE TABLE "users" (
         "id" serial NOT NULL,
         "name" character varying(255) NOT NULL,
         "email" character varying(255) NOT NULL,
         "created_at" timestamptz NULL DEFAULT now(),
         PRIMARY KEY ("id"),
         CONSTRAINT "users_email_key" UNIQUE ("email")
       );
    -> CREATE TABLE "blog_posts" (
         "id" serial NOT NULL,
         "title" character varying(255) NOT NULL,
         "body" text NULL,
         "author_id" integer NULL,
         "created_at" timestamptz NULL DEFAULT now(),
         PRIMARY KEY ("id"),
         CONSTRAINT "blog_posts_author_id_fkey" FOREIGN KEY ("author_id") REFERENCES "users" ("id") ON UPDATE NO ACTION ON DELETE NO ACTION
       );
  -- ok (2.896ms)

  -------------------------
  -- 1 migration
  -- 2 sql statements
atlas migrate apply --url "$DATABASE_URL"
Migrating to version 20260215120000 (1 migrations in total):

  -- migrating version 20260215120000
    -> CREATE TABLE `users` (
         `id` int NOT NULL AUTO_INCREMENT,
         `name` varchar(255) NOT NULL,
         `email` varchar(255) NOT NULL,
         `created_at` timestamp NULL DEFAULT CURRENT_TIMESTAMP,
         PRIMARY KEY (`id`),
         UNIQUE INDEX `email` (`email`)
       ) CHARSET utf8mb4 COLLATE utf8mb4_0900_ai_ci;
    -> CREATE TABLE `blog_posts` (
         `id` int NOT NULL AUTO_INCREMENT,
         `title` varchar(255) NOT NULL,
         `body` text NULL,
         `author_id` int NULL,
         `created_at` timestamp NULL DEFAULT CURRENT_TIMESTAMP,
         PRIMARY KEY (`id`),
         INDEX `author_fk` (`author_id`),
         CONSTRAINT `author_fk` FOREIGN KEY (`author_id`) REFERENCES `users` (`id`) ON UPDATE NO ACTION ON DELETE NO ACTION
       ) CHARSET utf8mb4 COLLATE utf8mb4_0900_ai_ci;
  -- ok (10.352ms)

  -------------------------
  -- 1 migration
  -- 2 sql statements
atlas migrate apply --url "$DATABASE_URL"
Migrating to version 20260215120000 (1 migrations in total):

  -- migrating version 20260215120000
    -> CREATE TABLE [users] (
         [id] int IDENTITY (1, 1) NOT NULL,
         [name] nvarchar(255) NOT NULL,
         [email] nvarchar(255) NOT NULL,
         [created_at] datetimeoffset(7) NULL DEFAULT (sysdatetimeoffset()),
         CONSTRAINT [PK_users] PRIMARY KEY ([id]),
         CONSTRAINT [UQ_users_email] UNIQUE ([email])
       );
    -> CREATE TABLE [blog_posts] (
         [id] int IDENTITY (1, 1) NOT NULL,
         [title] nvarchar(255) NOT NULL,
         [body] nvarchar(max) NULL,
         [author_id] int NULL,
         [created_at] datetimeoffset(7) NULL DEFAULT (sysdatetimeoffset()),
         CONSTRAINT [PK_blog_posts] PRIMARY KEY ([id]),
         CONSTRAINT [blog_posts_author_id_fkey] FOREIGN KEY ([author_id]) REFERENCES [users] ([id])
       );
  -- ok

  -------------------------
  -- 1 migration
  -- 2 sql statements
atlas migrate apply --url "$DATABASE_URL"
Migrating to version 20260215120000 (1 migrations in total):

  -- migrating version 20260215120000
    -> CREATE TABLE `users` (
         `id` UInt64,
         `name` String,
         `email` String,
         `created_at` DateTime DEFAULT now()
       )
       ENGINE = MergeTree
       ORDER BY `id`;
    -> CREATE TABLE `blog_posts` (
         `id` UInt64,
         `title` String,
         `body` String,
         `author_id` UInt64,
         `created_at` DateTime DEFAULT now()
       )
       ENGINE = MergeTree
       ORDER BY `id`;
  -- ok

  -------------------------
  -- 1 migration
  -- 2 sql statements
atlas migrate apply --url "$DATABASE_URL"
Migrating to version 20260215120000 (1 migrations in total):

  -- migrating version 20260215120000
    -> CREATE TABLE `users` (
         `id` integer NULL PRIMARY KEY AUTOINCREMENT,
         `name` text NOT NULL,
         `email` text NOT NULL,
         `created_at` text NULL DEFAULT (datetime('now'))
       );
    -> CREATE UNIQUE INDEX `users_email` ON `users` (`email`);
    -> CREATE TABLE `blog_posts` (
         `id` integer NULL PRIMARY KEY AUTOINCREMENT,
         `title` text NOT NULL,
         `body` text NULL,
         `author_id` integer NULL,
         `created_at` text NULL DEFAULT (datetime('now')),
         CONSTRAINT `0` FOREIGN KEY (`author_id`) REFERENCES `users` (`id`) ON UPDATE NO ACTION ON DELETE NO ACTION
       );
  -- ok

  -------------------------
  -- 1 migration
  -- 3 sql statements
Add a second migration
Add an updated_at column to blog_posts in your schema.sql:
- PostgreSQL
- MySQL
- SQL Server
- ClickHouse
- SQLite
CREATE TABLE users (
  id serial PRIMARY KEY,
  name varchar(255) NOT NULL,
  email varchar(255) UNIQUE NOT NULL,
  created_at timestamptz DEFAULT now()
);

CREATE TABLE blog_posts (
  id serial PRIMARY KEY,
  title varchar(255) NOT NULL,
  body text,
  author_id int REFERENCES users(id),
  created_at timestamptz DEFAULT now(),
  updated_at timestamptz DEFAULT now()
);
CREATE TABLE users (
  id int AUTO_INCREMENT PRIMARY KEY,
  name varchar(255) NOT NULL,
  email varchar(255) NOT NULL UNIQUE,
  created_at timestamp DEFAULT CURRENT_TIMESTAMP
);

CREATE TABLE blog_posts (
  id int AUTO_INCREMENT PRIMARY KEY,
  title varchar(255) NOT NULL,
  body text,
  author_id int,
  created_at timestamp DEFAULT CURRENT_TIMESTAMP,
  updated_at timestamp DEFAULT CURRENT_TIMESTAMP,
  CONSTRAINT author_fk FOREIGN KEY (author_id) REFERENCES users(id)
);
CREATE TABLE users (
  id int IDENTITY(1,1) PRIMARY KEY,
  name nvarchar(255) NOT NULL,
  email nvarchar(255) NOT NULL UNIQUE,
  created_at datetimeoffset DEFAULT SYSDATETIMEOFFSET()
);

CREATE TABLE blog_posts (
  id int IDENTITY(1,1) PRIMARY KEY,
  title nvarchar(255) NOT NULL,
  body nvarchar(max),
  author_id int REFERENCES users(id),
  created_at datetimeoffset DEFAULT SYSDATETIMEOFFSET(),
  updated_at datetimeoffset DEFAULT SYSDATETIMEOFFSET()
);
CREATE TABLE users (
  id UInt64,
  name String,
  email String,
  created_at DateTime DEFAULT now()
) ENGINE = MergeTree()
ORDER BY id;

CREATE TABLE blog_posts (
  id UInt64,
  title String,
  body String,
  author_id UInt64,
  created_at DateTime DEFAULT now(),
  updated_at DateTime DEFAULT now()
) ENGINE = MergeTree()
ORDER BY id;
CREATE TABLE users (
  id integer PRIMARY KEY AUTOINCREMENT,
  name text NOT NULL,
  email text NOT NULL UNIQUE,
  created_at text DEFAULT (datetime('now'))
);

CREATE TABLE blog_posts (
  id integer PRIMARY KEY AUTOINCREMENT,
  title text NOT NULL,
  body text,
  author_id integer REFERENCES users(id),
  created_at text DEFAULT (datetime('now')),
  updated_at text DEFAULT (datetime('now'))
);
Generate the migration:
- PostgreSQL
- MySQL
- SQL Server
- ClickHouse
- SQLite
atlas migrate diff add_updated_at \
  --to file://schema.sql \
  --dev-url "docker://postgres/17/dev?search_path=public"
-- Modify "blog_posts" table
ALTER TABLE "blog_posts" ADD COLUMN "updated_at" timestamptz NULL DEFAULT now();
atlas migrate diff add_updated_at \
  --to file://schema.sql \
  --dev-url "docker://mysql/8/dev"
-- Modify "blog_posts" table
ALTER TABLE `blog_posts` ADD COLUMN `updated_at` timestamp NULL DEFAULT CURRENT_TIMESTAMP;
atlas migrate diff add_updated_at \
  --to file://schema.sql \
  --dev-url "docker://sqlserver/2022-latest/dev?mode=schema"
-- Modify "blog_posts" table
ALTER TABLE [blog_posts] ADD [updated_at] datetimeoffset(7) NULL DEFAULT (sysdatetimeoffset());
atlas migrate diff add_updated_at \
  --to file://schema.sql \
  --dev-url "docker://clickhouse/23.11/dev"
-- Modify "blog_posts" table
ALTER TABLE `blog_posts` ADD COLUMN `updated_at` DateTime DEFAULT now();
atlas migrate diff add_updated_at \
  --to file://schema.sql \
  --dev-url "sqlite://dev?mode=memory"
-- Modify "blog_posts" table
ALTER TABLE `blog_posts` ADD COLUMN `updated_at` text NULL DEFAULT (datetime('now'));
Atlas compares the migration directory against the desired schema and generates only the diff - a single ALTER TABLE.
Lint and apply:
- PostgreSQL
- MySQL
- SQL Server
- ClickHouse
- SQLite
atlas migrate lint \
  --dev-url "docker://postgres/17/dev?search_path=public" \
  --latest 1
Analyzing changes from version 20260215120000 to 20260215120100 (1 migration in total):

  -- analyzing version 20260215120100
    -- no diagnostics found
  -- ok (562.917µs)

  -------------------------
  -- 1 version ok
  -- 1 schema change
atlas migrate apply --url "$DATABASE_URL"
Migrating to version 20260215120100 from 20260215120000 (1 migrations in total):

  -- migrating version 20260215120100
    -> ALTER TABLE "blog_posts" ADD COLUMN "updated_at" timestamptz NULL DEFAULT now();
  -- ok (3.224ms)

  -------------------------
  -- 1 migration
  -- 1 sql statement
atlas migrate lint \
  --dev-url "docker://mysql/8/dev" \
  --latest 1
Analyzing changes from version 20260215120000 to 20260215120100 (1 migration in total):

  -- analyzing version 20260215120100
    -- no diagnostics found
  -- ok (47.626ms)

  -------------------------
  -- 1 version ok
  -- 1 schema change
atlas migrate apply --url "$DATABASE_URL"
Migrating to version 20260215120100 from 20260215120000 (1 migrations in total):

  -- migrating version 20260215120100
    -> ALTER TABLE `blog_posts` ADD COLUMN `updated_at` timestamp NULL DEFAULT CURRENT_TIMESTAMP;
  -- ok (24.542ms)

  -------------------------
  -- 1 migration
  -- 1 sql statement
atlas migrate lint \
  --dev-url "docker://sqlserver/2022-latest/dev?mode=schema" \
  --latest 1
Analyzing changes from version 20260215120000 to 20260215120100 (1 migration in total):

  -- analyzing version 20260215120100
    -- no diagnostics found
  -- ok

  -------------------------
  -- 1 version ok
  -- 1 schema change
atlas migrate apply --url "$DATABASE_URL"
Migrating to version 20260215120100 from 20260215120000 (1 migrations in total):

  -- migrating version 20260215120100
    -> ALTER TABLE [blog_posts] ADD [updated_at] datetimeoffset(7) NULL DEFAULT (sysdatetimeoffset());
  -- ok

  -------------------------
  -- 1 migration
  -- 1 sql statement
atlas migrate lint \
  --dev-url "docker://clickhouse/23.11/dev" \
  --latest 1
Analyzing changes from version 20260215120000 to 20260215120100 (1 migration in total):

  -- analyzing version 20260215120100
    -- no diagnostics found
  -- ok

  -------------------------
  -- 1 version ok
  -- 1 schema change
atlas migrate apply --url "$DATABASE_URL"
Migrating to version 20260215120100 from 20260215120000 (1 migrations in total):

  -- migrating version 20260215120100
    -> ALTER TABLE `blog_posts` ADD COLUMN `updated_at` DateTime DEFAULT now();
  -- ok

  -------------------------
  -- 1 migration
  -- 1 sql statement
atlas migrate lint \
  --dev-url "sqlite://dev?mode=memory" \
  --latest 1
Analyzing changes from version 20260215120000 to 20260215120100 (1 migration in total):

  -- analyzing version 20260215120100
    -- no diagnostics found
  -- ok

  -------------------------
  -- 1 version ok
  -- 1 schema change
atlas migrate apply --url "$DATABASE_URL"
Migrating to version 20260215120100 from 20260215120000 (1 migrations in total):

  -- migrating version 20260215120100
    -> ALTER TABLE `blog_posts` ADD COLUMN `updated_at` text NULL DEFAULT (datetime('now'));
  -- ok

  -------------------------
  -- 1 migration
  -- 1 sql statement
Your migrations/ directory now contains the full history:
migrations/
├── 20260215120000_initial.sql
├── 20260215120100_add_updated_at.sql
└── atlas.sum
The workflow is: edit schema -> migrate diff -> migrate lint -> migrate apply.
These files can be checked into version control, reviewed in PRs, and applied in CI/CD.
Read more about Declarative vs Versioned workflows
to decide which is right for your project.
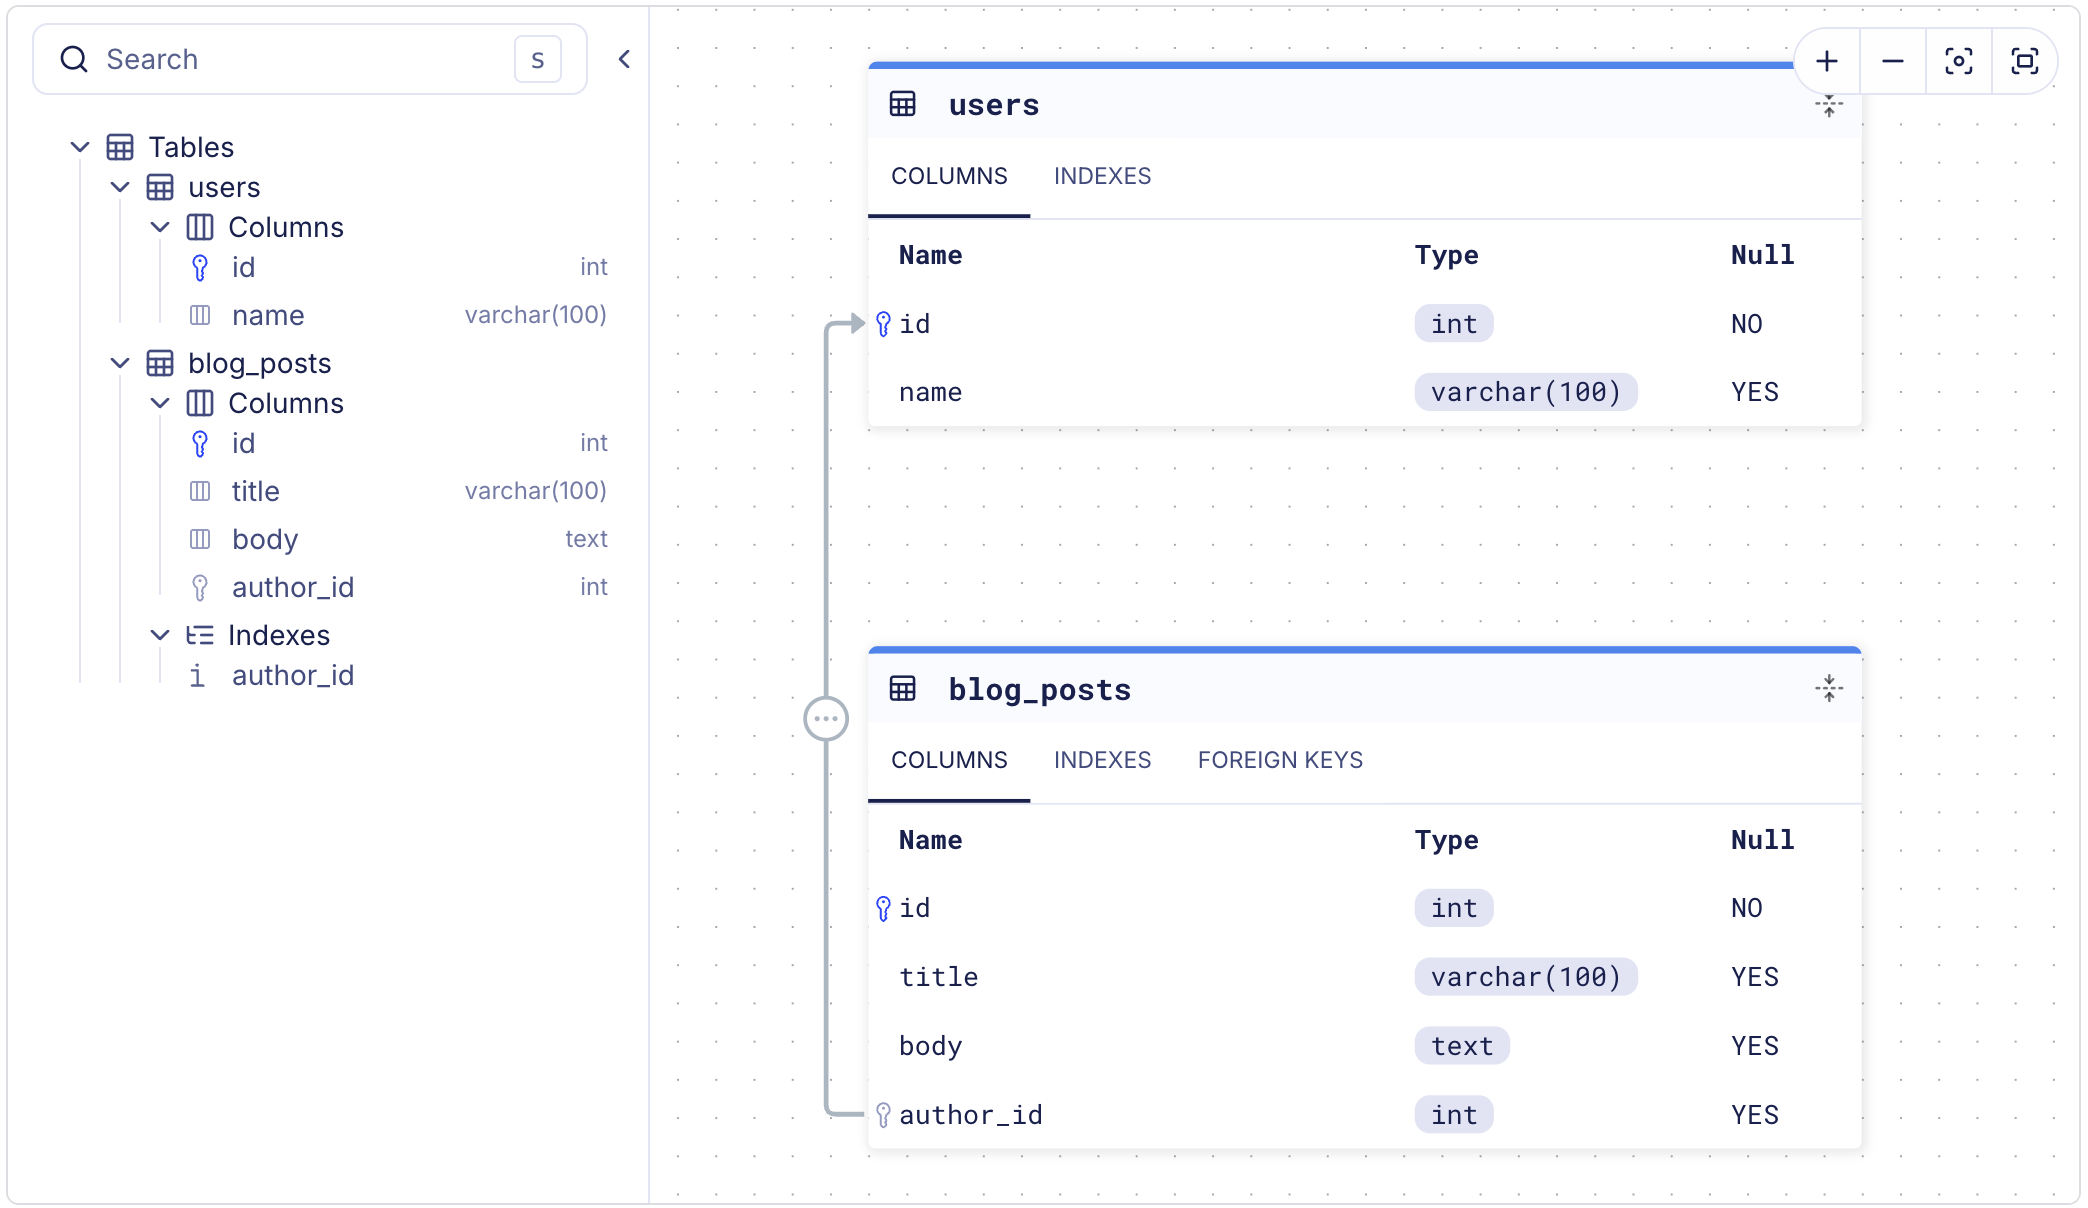
Visualize Your Schema
Open an interactive ERD of your schema in the browser using the -w flag:
atlas schema inspect --url "$DATABASE_URL" -w
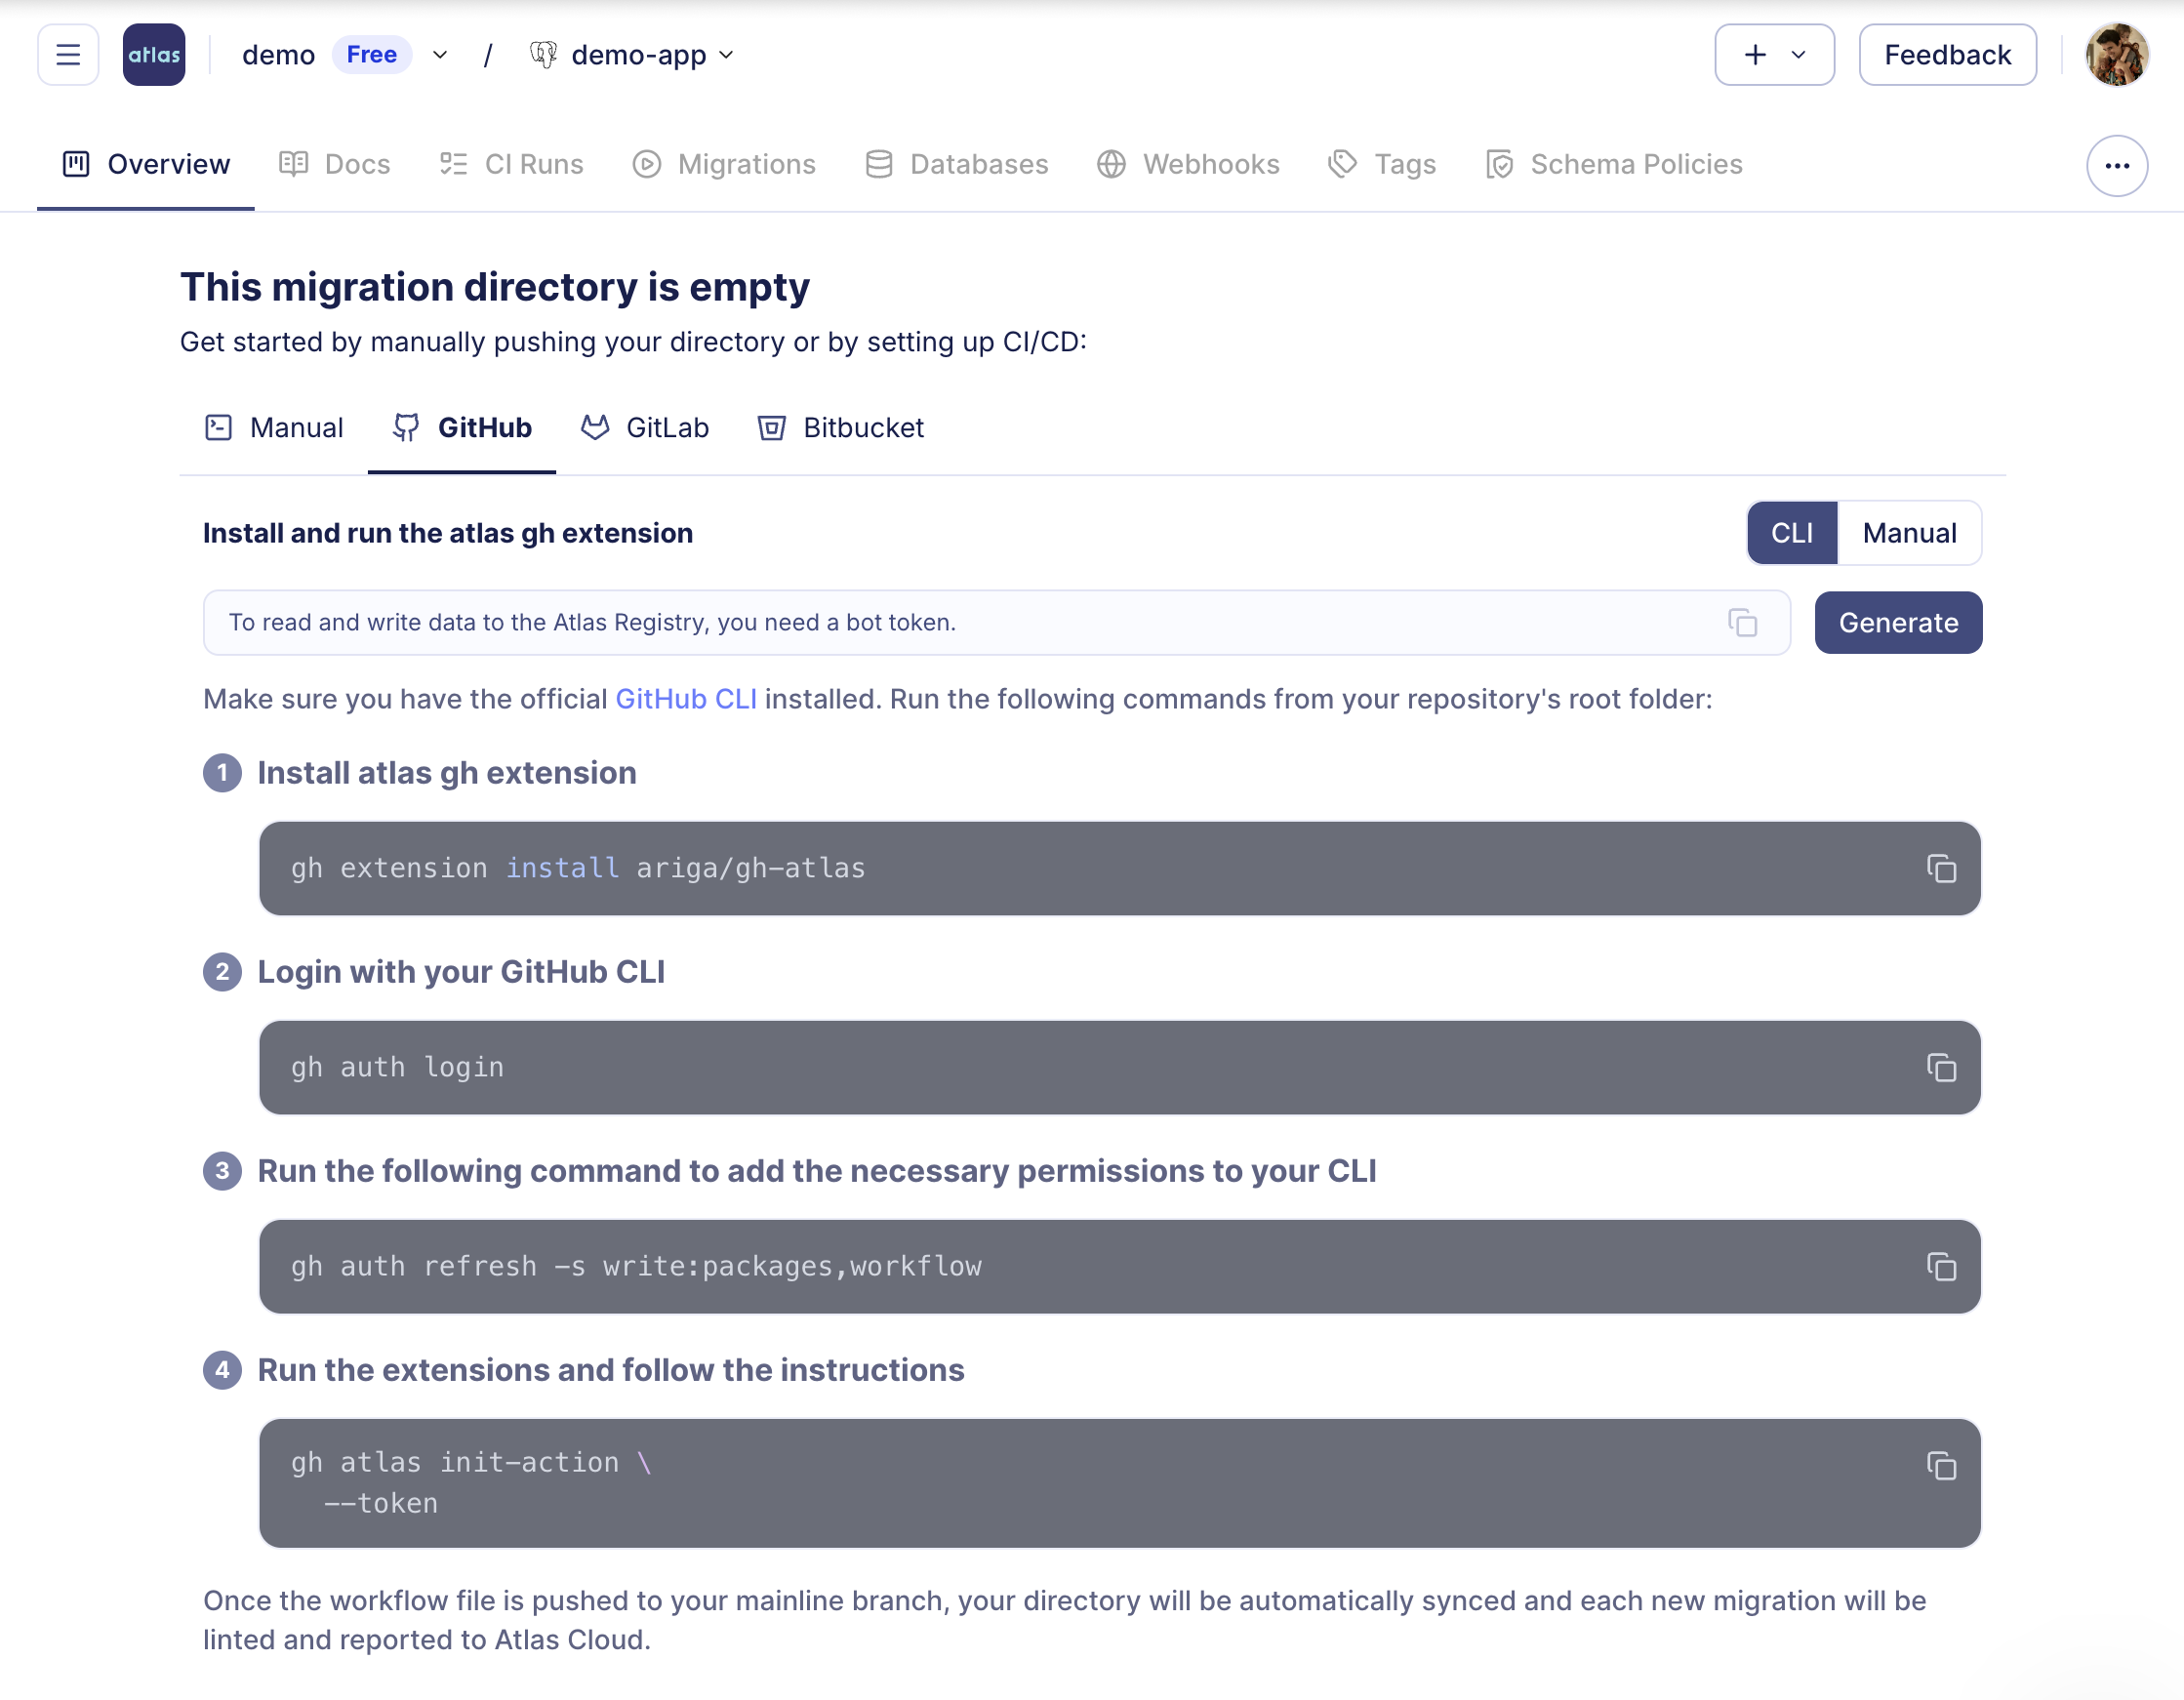
Next Step: Setup CI/CD
After getting familiar with the basics of Atlas, the next step is to integrate it into your development workflow. Sign up for a free trial to unlock Pro features, then set up your CI/CD pipeline by running the following command, and proceeding with the steps below:
atlas login
- 1) Create a Repo
- 2) Setup CI/CD
- 3) PR Example

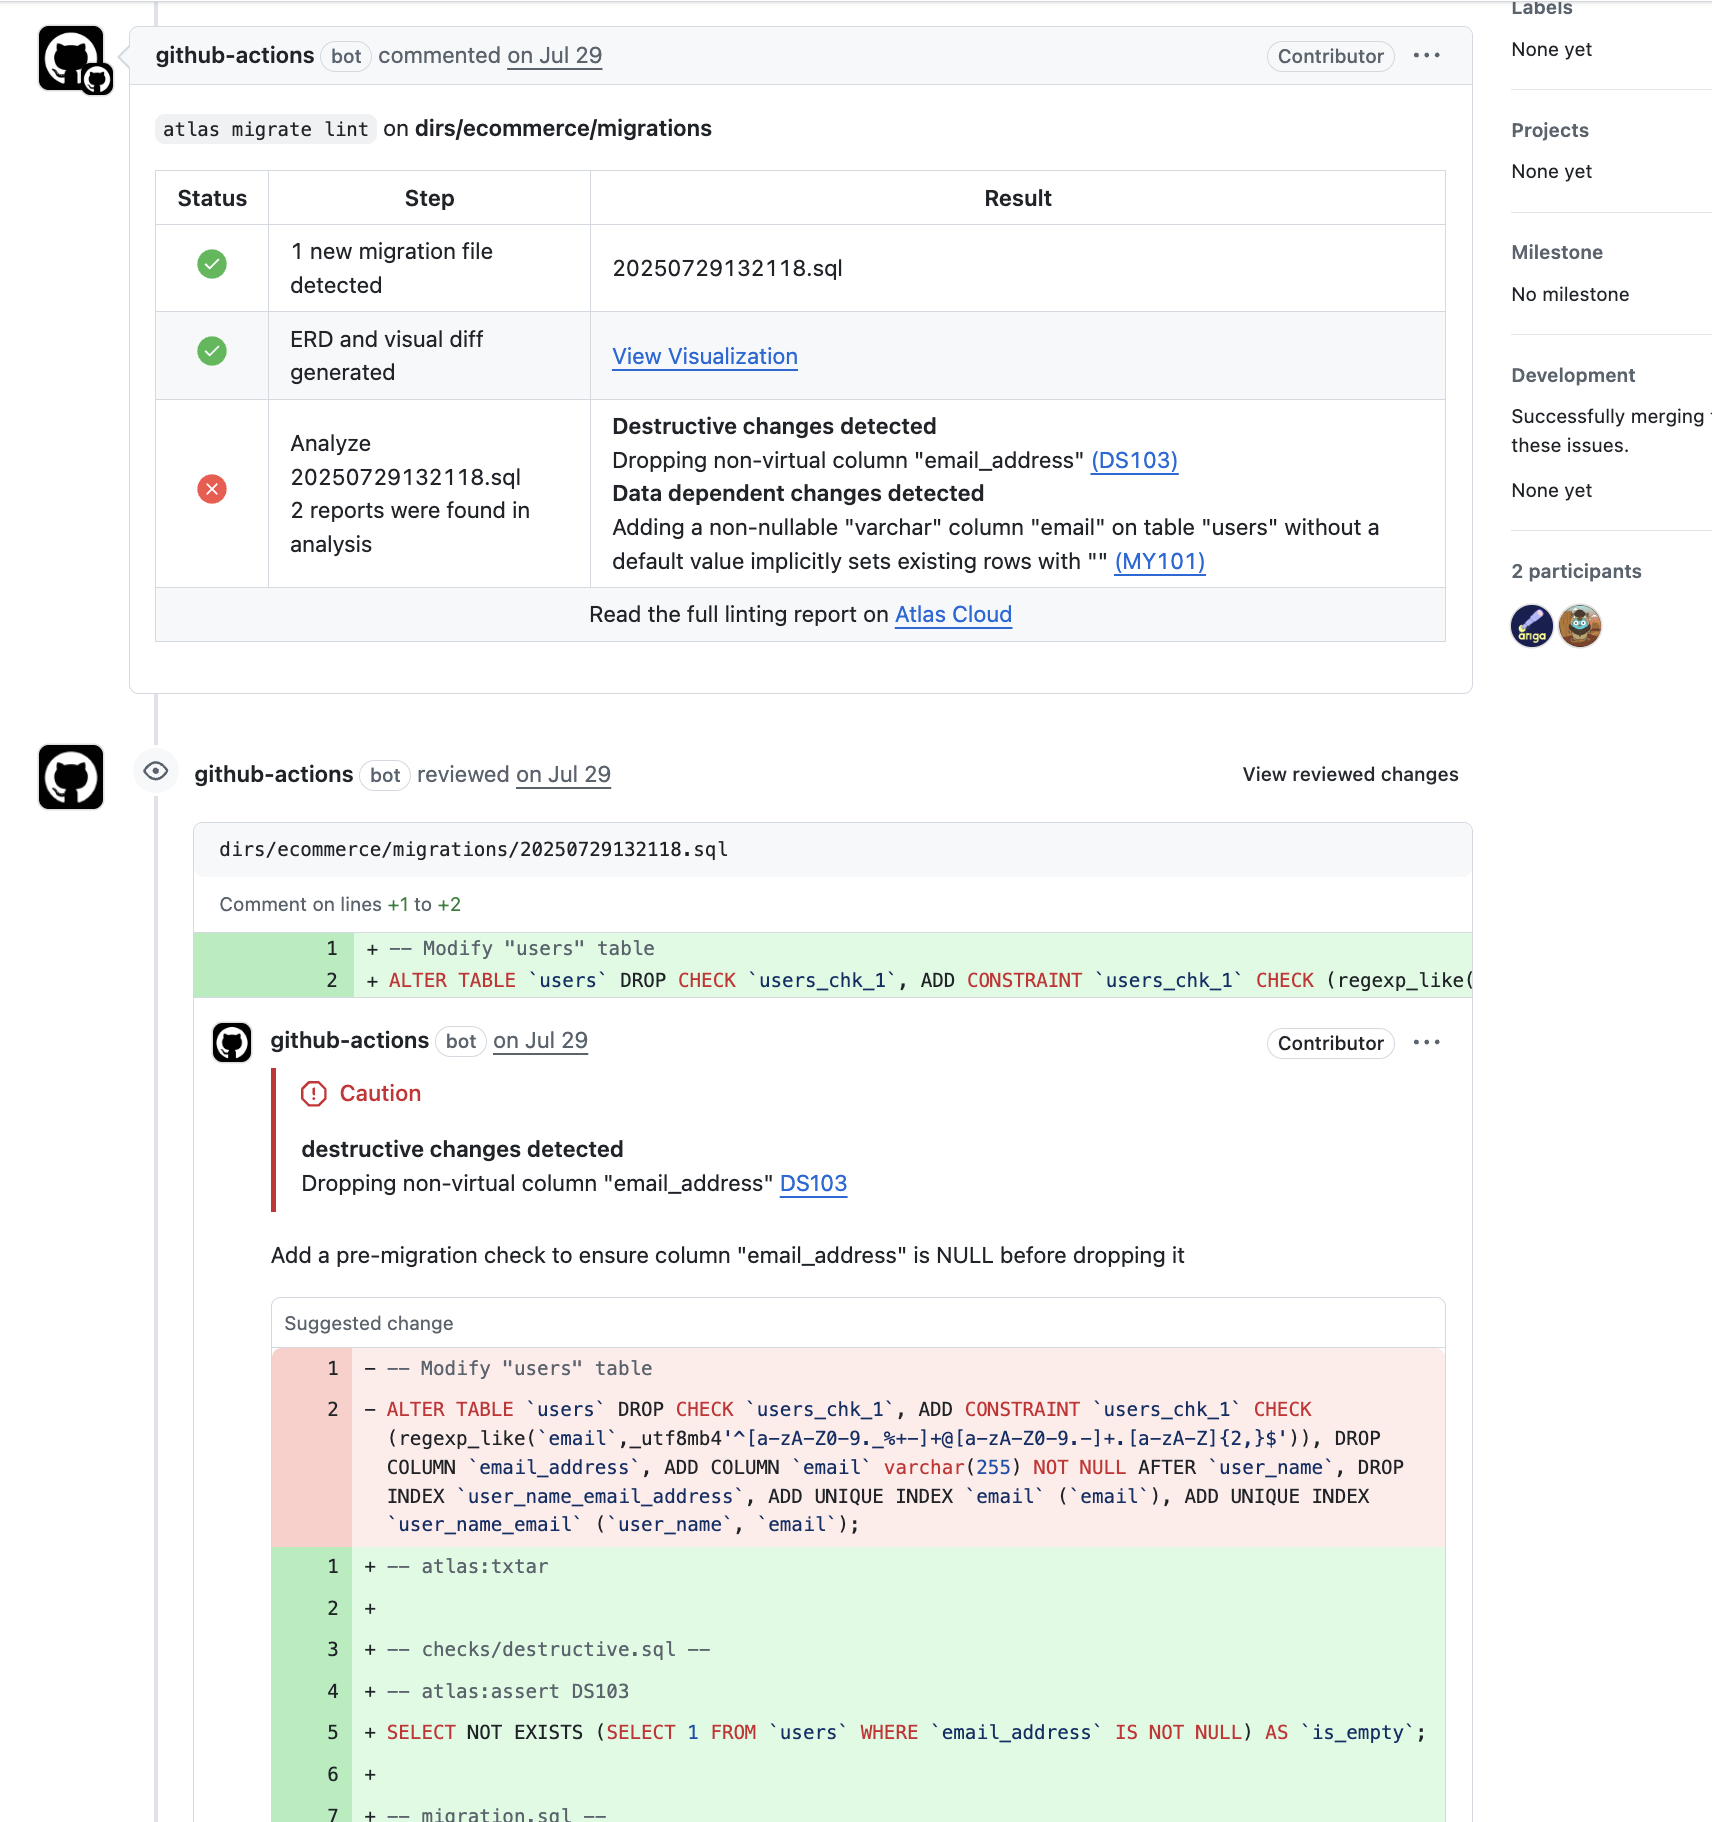
What's Next?
Ready to evaluate Atlas for your team? Follow the Evaluating Atlas guide for a hands-on walkthrough covering project setup, schema-as-code, CI/CD, testing, and advanced features. Or jump directly into a specific topic:
 Import an Existing Database
Already have a database? Start managing it with Atlas.
 Use with an ORM
Integrate Atlas with GORM, TypeORM, Prisma, Drizzle, Django, SQLAlchemy, Sequelize, Hibernate, Doctrine, and more.
 Database Governance
Enforce database security as code - schema rules, naming policies, and compliance checks.
 Configure Your AI Agent
Set up Claude Code, Cursor, Copilot, or Codex with Atlas-specific instructions.
We have a super friendly #getting-started channel on our community chat on Discord.
Join our Discord server