Teaching AI Agents to Manage Database Schemas with Atlas

AI agents are becoming a core part of daily development. We utilize them to help us write code, fix syntax errors, and perform tasks that speed up routine work. However, when it comes to high-risk operations like database schema changes, we are more hesitant to hand off control.
If you're currently partaking in the online conversation around AI agents, you have likely seen many posts like this where an AI agent executed improper schema changes or, in the case of our vibe coder, deleted whole databases.
While the AI agent can generate migrations and provide suggestions, it’s important to ensure these operations are performed safely.
Atlas is a database schema management tool that ensures safe and reliable schema changes. Users define their schemas as code, and Atlas performs migrations based on changes to these code definitions. With Atlas, you can configure lint checks, pre-migration validations, and schema testing, making it an ideal counterpart for AI agents.
In this post, we'll show you how to configure popular AI agents to work with Atlas to ensure that schema changes made by the agent are secure.
Instructing the AI to Use Atlas
Popular AI agents like GitHub Copilot, Cursor, and Claude Code can be enhanced with custom instructions or rules files that guide their behavior in specific contexts. Using these instructions helps align the AI to your team's workflows and best practices, making it more predictable and effective.
To ensure your AI agent follows best practices when managing your schema, we have released our own instructions files that you can use to configure popular AI agents to work with Atlas.
These instructions teach the AI about core Atlas concepts, security concerns (e.g., the AI should not ask you for database credentials), common workflows, and basic troubleshooting steps.
You can read more about how to set up your AI agent with Atlas in our new AI Tools guide: Using Atlas with AI Agents.
Example: Configuring Cursor with Atlas
Cursor supports adding custom, natural language rules that guide the AI assistant's behavior.
This file contains a comprehensive run-through of Atlas concepts and commands, common troubleshooting steps, and key principles
to follow when managing database schemas with Atlas. It explains to the agent how an atlas.hcl file is structured, how to use
and configure a dev database, and how to follow best practices for security. It also outlines common
workflows step-by-step and explains their purpose so the agent can accurately respond to your management requests. Finally, the
instructions explicitly outline the workflow pattern the agent should follow when making schema changes and emphasize key reminders
to ensure the agent's reliable and consistent use of Atlas.
Let's see how this works in practice:
- Start by installing Atlas:
- macOS + Linux
- Homebrew
- Docker
- Windows
- CI
- Manual Installation
To download and install the latest release of the Atlas CLI, simply run the following in your terminal:
curl -sSf https://atlasgo.sh | sh
Get the latest release with Homebrew:
brew install ariga/tap/atlas
To pull the Atlas image and run it as a Docker container:
docker pull arigaio/atlas
docker run --rm arigaio/atlas --help
If the container needs access to the host network or a local directory, use the --net=host flag and mount the desired
directory:
docker run --rm --net=host \
  -v $(pwd)/migrations:/migrations \
  arigaio/atlas migrate apply \
  --url "mysql://root:pass@:3306/test"
Download the latest release and move the atlas binary to a file location on your system PATH.
GitHub Actions
Use the setup-atlas action to install Atlas in your GitHub Actions workflow:
- uses: ariga/setup-atlas@v0
  with:
    cloud-token: ${{ secrets.ATLAS_CLOUD_TOKEN }}
Other CI Platforms
For other CI/CD platforms, use the installation script. See the CI/CD integrations for more details.
- Next, configure your repository to follow Atlas's management structure:
Desired schema as code
Define your desired schema manually in HCL or SQL files, using ORM models, or by inspecting an existing database and saving it as code.
For this example, let's start with a simple todos table that stores the entries of a "to do" list:
schema "public" {
}
table "todos" {
  schema = schema.public
  column "id" {
    null = false
    type = serial
  }
  column "title" {
    null = false
    type = character_varying(255)
  }
  column "description" {
    null = true
    type = text
  }
  column "is_completed" {
    null    = false
    type    = boolean
    default = false
  }
  column "due_date" {
    null = true
    type = timestamptz
  }
  primary_key {
    columns = [column.id]
  }
}
Atlas configuration file
Create an atlas.hcl file in the root of your repository to configure the URLs to your desired schema,
target database, and dev database, as well as any other relevant components (e.g., custom schema policy).
env "local" {
  // URL to target database
  url = "postgres://postgres:pass@localhost:5432/demo?search_path=public&sslmode=disable"
  // URL to dev database
  dev = "docker://postgres/15/dev?search_path=public"
  migration {
    // URL to migration directory for versioned migrations
    dir = "file://migrations"
  }
  schema {
    // URL to desired schema definition
    src = "file://schema.pg.hcl"
  }
}
- Finally, copy the following instructions file to your repository to apply our rules to your Cursor agent:
Paste this into .cursor/rules/atlas.mdc
---
description: Provides rules relevant for database management, database schema, and migrations. Use Atlas to view, inspect, and understand database schemas. Relevant to all *.sql files, atlas.hcl and schema.*.hcl files, and ALL database-related changes.
alwaysApply: true
---
# Atlas Database Schema Management

Atlas is a language-independent tool for managing and migrating database schemas using modern DevOps principles.

## Quick Reference

```bash
atlas schema inspect --env <name>
atlas schema validate --env <name>
atlas migrate status --env <name>
atlas migrate diff --env <name>
atlas migrate lint --env <name> --latest 1
atlas migrate apply --env <name>
atlas whoami
```

## Core Concepts and Configurations

### Configuration File Structure
Atlas uses `atlas.hcl` configuration files with the following structure:

```hcl
env "<name>" {
  url = getenv("DATABASE_URL")
  dev = "docker://postgres/15/dev?search_path=public"

  migration {
    dir = "file://migrations"
  }

  schema {
    src = "file://schema.hcl"
  }
}
```

### Dev Database
Atlas uses a temporary "dev-database" to process and validate schemas. The URL format depends on whether the project uses a single schema or multiple schemas:

```
# Schema-scoped (single schema — most common)
--dev-url "docker://mysql/8/dev"
--dev-url "docker://postgres/15/dev?search_path=public"
--dev-url "sqlite://dev?mode=memory"
--dev-url "docker://sqlserver/2022-latest/dev?mode=schema"

# Database-scoped (multiple schemas, extensions, or event triggers)
--dev-url "docker://mysql/8"
--dev-url "docker://postgres/15/dev"
--dev-url "docker://sqlserver/2022-latest/dev?mode=database"

# PostGIS / pgvector
--dev-url "docker://postgis/latest/dev?search_path=public"
--dev-url "docker://pgvector/pg17/dev?search_path=public"
```

**Important:** Using the wrong scope causes errors (`ModifySchema is not allowed`) or silently drops database-level objects from migrations. Match the dev URL scope to the project's target database URL.

See https://atlasgo.io/concepts/dev-database for additional drivers and options.

### Environment Variables and Security

**DO**: Use secure configuration patterns
```hcl
// Using environment variables (recommended)
env "<name>" {
  url = getenv("DATABASE_URL")
}

// Using external data sources
data "external" "envfile" {
  program = ["npm", "run", "envfile.js"]
}

locals {
  envfile = jsondecode(data.external.envfile)
}

env "<name>" {
  url = local.envfile.DATABASE_URL
}
```

**DON'T**: Hardcode sensitive values
```hcl
// Never do this
env "prod" {
  url = "postgres://user:password123@prod-host:5432/database"
}
```

### Schema Sources

#### HCL Schema
```hcl
data "hcl_schema" "<name>" {
  path = "schema.hcl"
}

env "<name>" {
  schema {
    src = data.hcl_schema.<name>.url
  }
}
```

#### External Schema (ORM Integration)
The `external_schema` data source imports SQL schema from an external program.

```hcl
data "external_schema" "drizzle" {
  program = ["npx", "drizzle-kit", "export"]
}

data "external_schema" "django" {
  program = ["python", "manage.py", "atlas-provider-django", "--dialect", "postgresql"]
}

env "<name>" {
  schema {
    src = data.external_schema.django.url
  }
}
```

**Important:** The output must be a complete SQL schema (not a diff). If errors occur, run the program directly to isolate the issue.

#### Composite Schema (Pro)
Combine multiple schemas into one. Requires `atlas login`.

```hcl
data "composite_schema" "app" {
  schema "users" {
    url = data.external_schema.auth_service.url
  }
  schema "graph" {
    url = "ent://ent/schema"
  }
}

env "<name>" {
  schema {
    src = data.composite_schema.app.url
  }
}
```

## Common Workflows

### 1. Schema Inspection / Visualization

1. Start by listing tables — don't inspect the entire schema at once for large databases.
2. Default output is HCL. Use `--format "{{ json . }}"` for JSON or `--format "{{ sql . }}"` for SQL.
3. Use `--include`/`--exclude` to filter specific tables or objects.

**Inspect the environment's schema source (`env://src`):**
```bash
atlas schema inspect --env <name> --url "env://src" --format "{{ sql . }}"
atlas schema inspect --env <name> --url "env://src" --format "{{ json . }}" | jq ".schemas[].tables[].name"
```

**Inspect the environment's target database:**
```bash
atlas schema inspect --env <name> --format "{{ sql . }}"
atlas schema inspect --env <name> --include "users" --format "{{ sql . }}"
```

**Inspect migration directory:**
```bash
atlas schema inspect --env <name> --url file://migrations --format "{{ sql . }}"
```

Add `-w` to open a web-based ERD visualization (requires `atlas login`).

### 2. Migration Status

Compare applied migrations against the migrations directory. Only use when you know the target database.

```bash
atlas migrate status --env <name>
atlas migrate status --dir file://migrations --url <url>
```

### 3. Migration Generation / Diffing

```bash
atlas migrate diff --env <name> "add_user_table"

atlas migrate diff \
  --dir file://migrations \
  --dev-url docker://postgres/15/dev \
  --to file://schema.hcl \
  "add_user_table"
```

**Configuration for migration generation:**
```hcl
env "<name>" {
  dev = "docker://postgres/15/dev?search_path=public"

  migration {
    dir = "file://migrations"
  }

  schema {
    src = "file://schema.hcl"
    # Or: src = data.external_schema.<name>.url
    # Or: src = getenv("DATABASE_URL")
  }
}
```

### 4. Migration Linting

```bash
atlas migrate lint --env <name> --latest 1
atlas migrate lint --env <name> --latest 3
atlas migrate lint --env ci
```

**Linting configuration:**
```hcl
lint {
  destructive {
    error = false  // Allow destructive changes with warnings
  }
}

env "ci" {
  lint {
    git {
      base = "main"
    }
  }
}
```

To suppress a specific lint error, add `-- atlas:nolint` before the SQL statement.

> **Important:** When fixing migration issues:
> - **Unapplied migrations:** Edit the file, then run `atlas migrate hash --env "<name>"`
> - **Applied migrations:** Never edit directly. Create a new corrective migration instead.
> - **Never use `-- atlas:nolint` without properly fixing the issue or getting user approval.**

### 5. Applying Changes

**Versioned (migration files):**
```bash
atlas migrate apply --env <name> --dry-run    # Always preview first
atlas migrate apply --env <name>
```

**Declarative (direct apply — fast local iteration):**
```bash
atlas schema apply --env <name> --dry-run     # Preview changes
atlas schema apply --env <name>               # Apply directly to database
```

Use `schema apply` for fast edit-apply cycles on a local database without generating migration files. Add `--auto-approve` to skip the confirmation prompt during development.

## Troubleshooting

```bash
atlas version
atlas whoami
atlas migrate hash --env <name>
```

**Missing driver error**: Either `--url` or `--dev-url` is missing or incorrect.

## Key Reminders

1. **Always read `atlas.hcl` first** — use environment names from config
2. **Never hardcode database URLs** — use `getenv()` or secure data sources
3. **Run `atlas schema validate`** after editing schema files
4. **Run `atlas migrate hash`** after manually editing migration files
5. **Use `atlas migrate lint`** to validate migrations before applying
6. **Always use `--dry-run`** before applying migrations
7. **Use `--include`/`--exclude`** to filter tables in schema inspection
8. **Never ask for sensitive information** such as passwords or database URLs
9. **Never ignore linting errors** — fix them or get user approval
10. **Inspect schemas at high level first** — schemas might be very large
11. **Only use atlas commands listed here** — other commands may not be supported
12. **Prefer `atlas schema inspect`** over reading migration files directly

@atlas.hcl
Prompting the AI Agent
Once these instructions are in place, you can use the Cursor agent to manage your database schema with Atlas.
Let's go over a standard workflow.
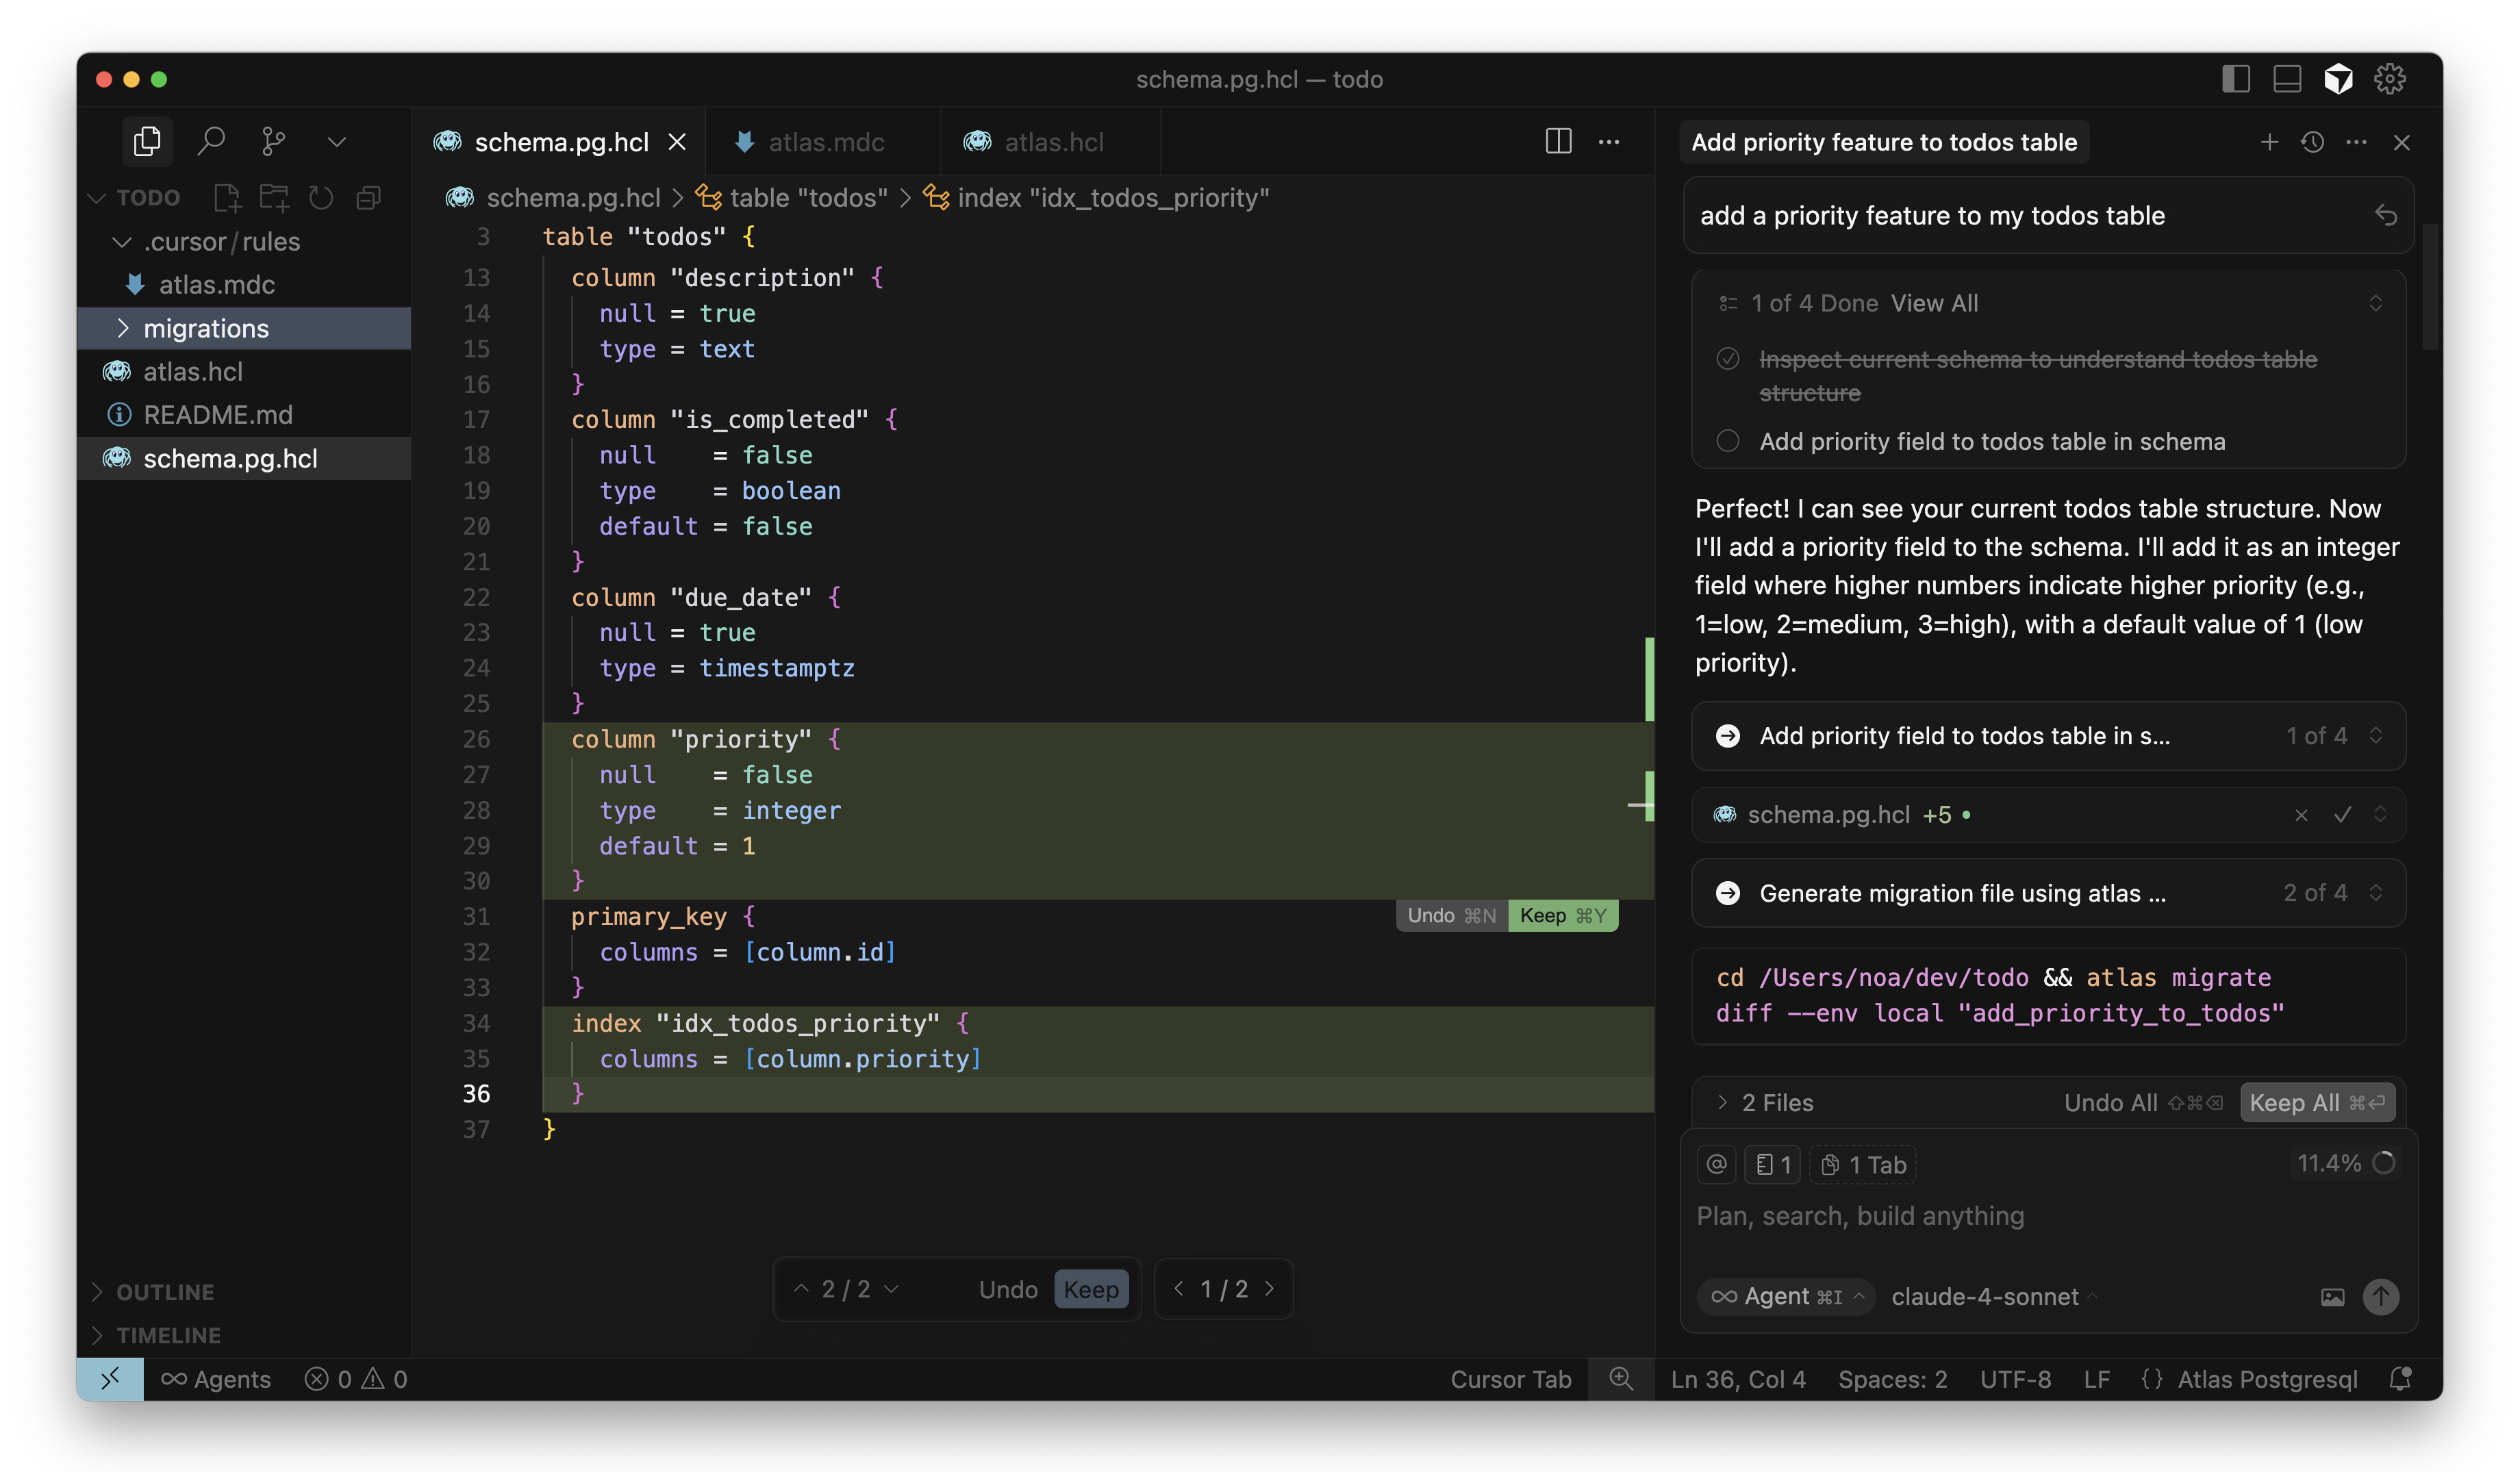
Supposed I want to add a priority column to my todos table to organize my list by urgency. I'll begin by prompting the Cursor agent:
add a priority feature to the to do list
1. Change the desired schema
The AI agent should first inspect the schema to understand its current state. Then, it should make the necessary changes in the files.
In this example, Cursor adds a priority column and an index for it to the todos table.
2. Create a migration file and fix issues
After modifying the schema files, the AI agent should generate a migration file by running atlas migrate diff.
Next, per the instructions in the prompt, the agent should run atlas migrate lint to validate the migration file. If the
linting results in any errors or warnings, the agent should fix them and repeat this process until there are no more issues.
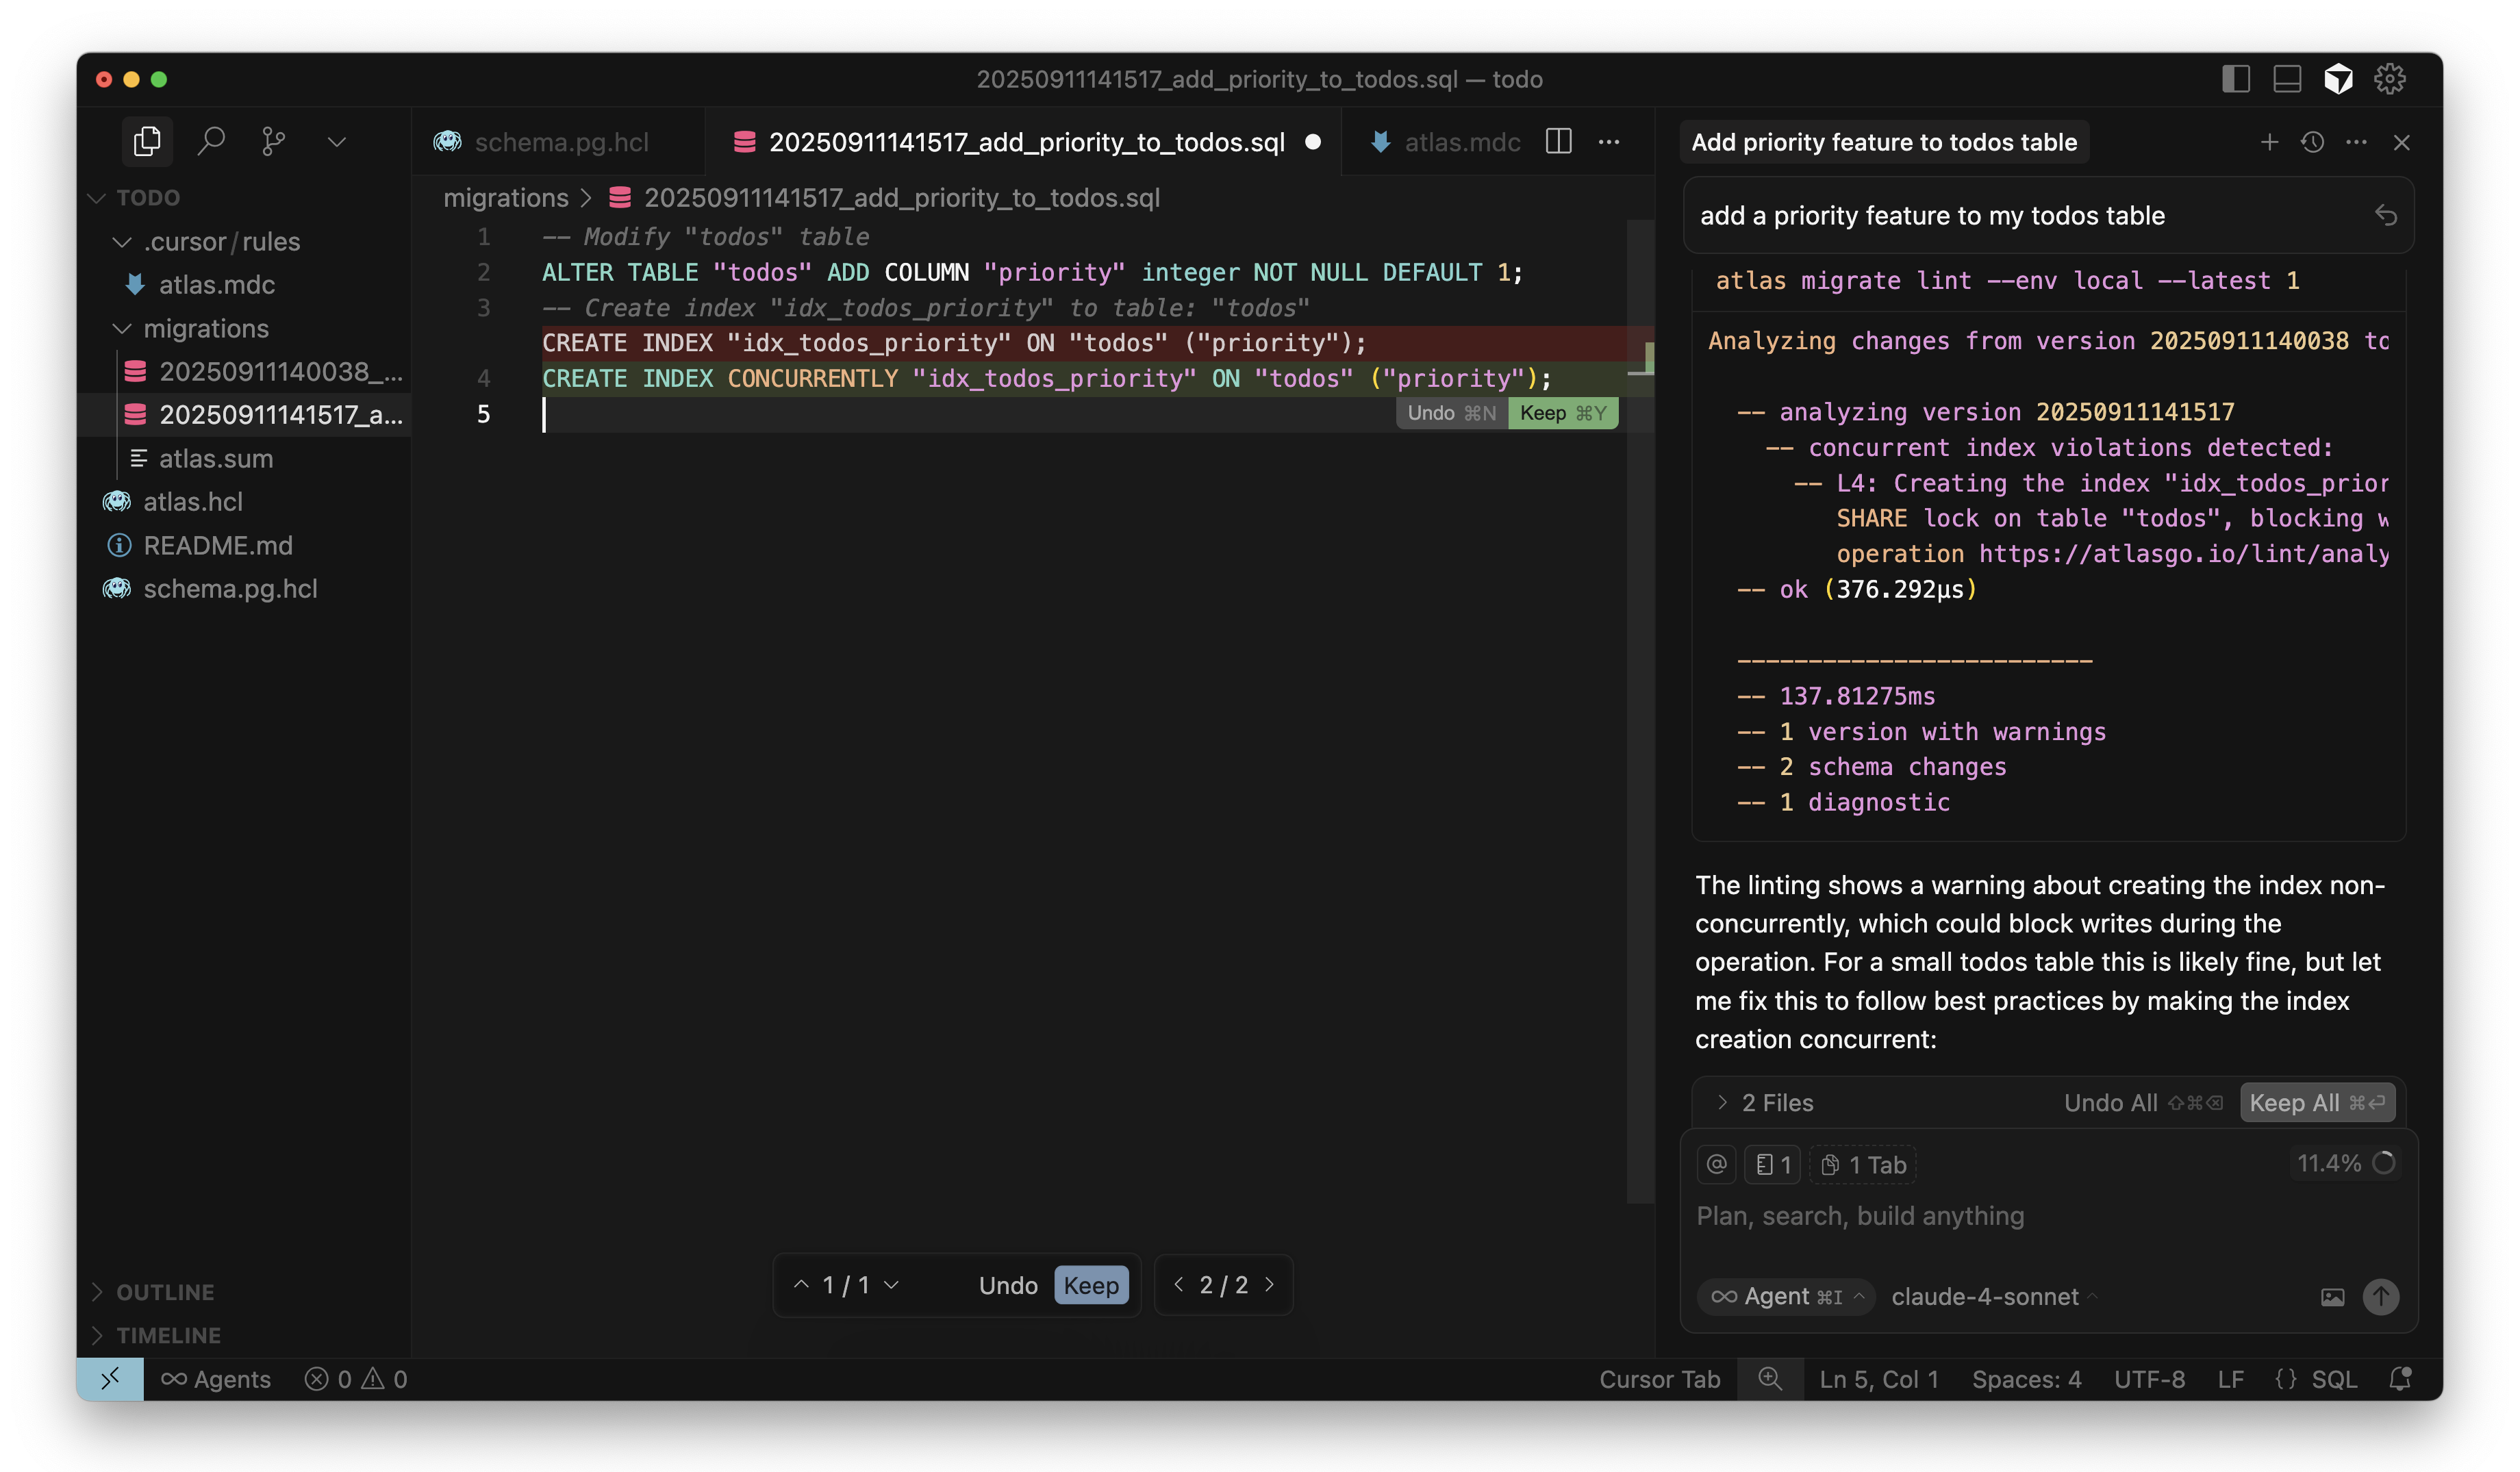
Cursor adds CONCURRENTLY to index in migration
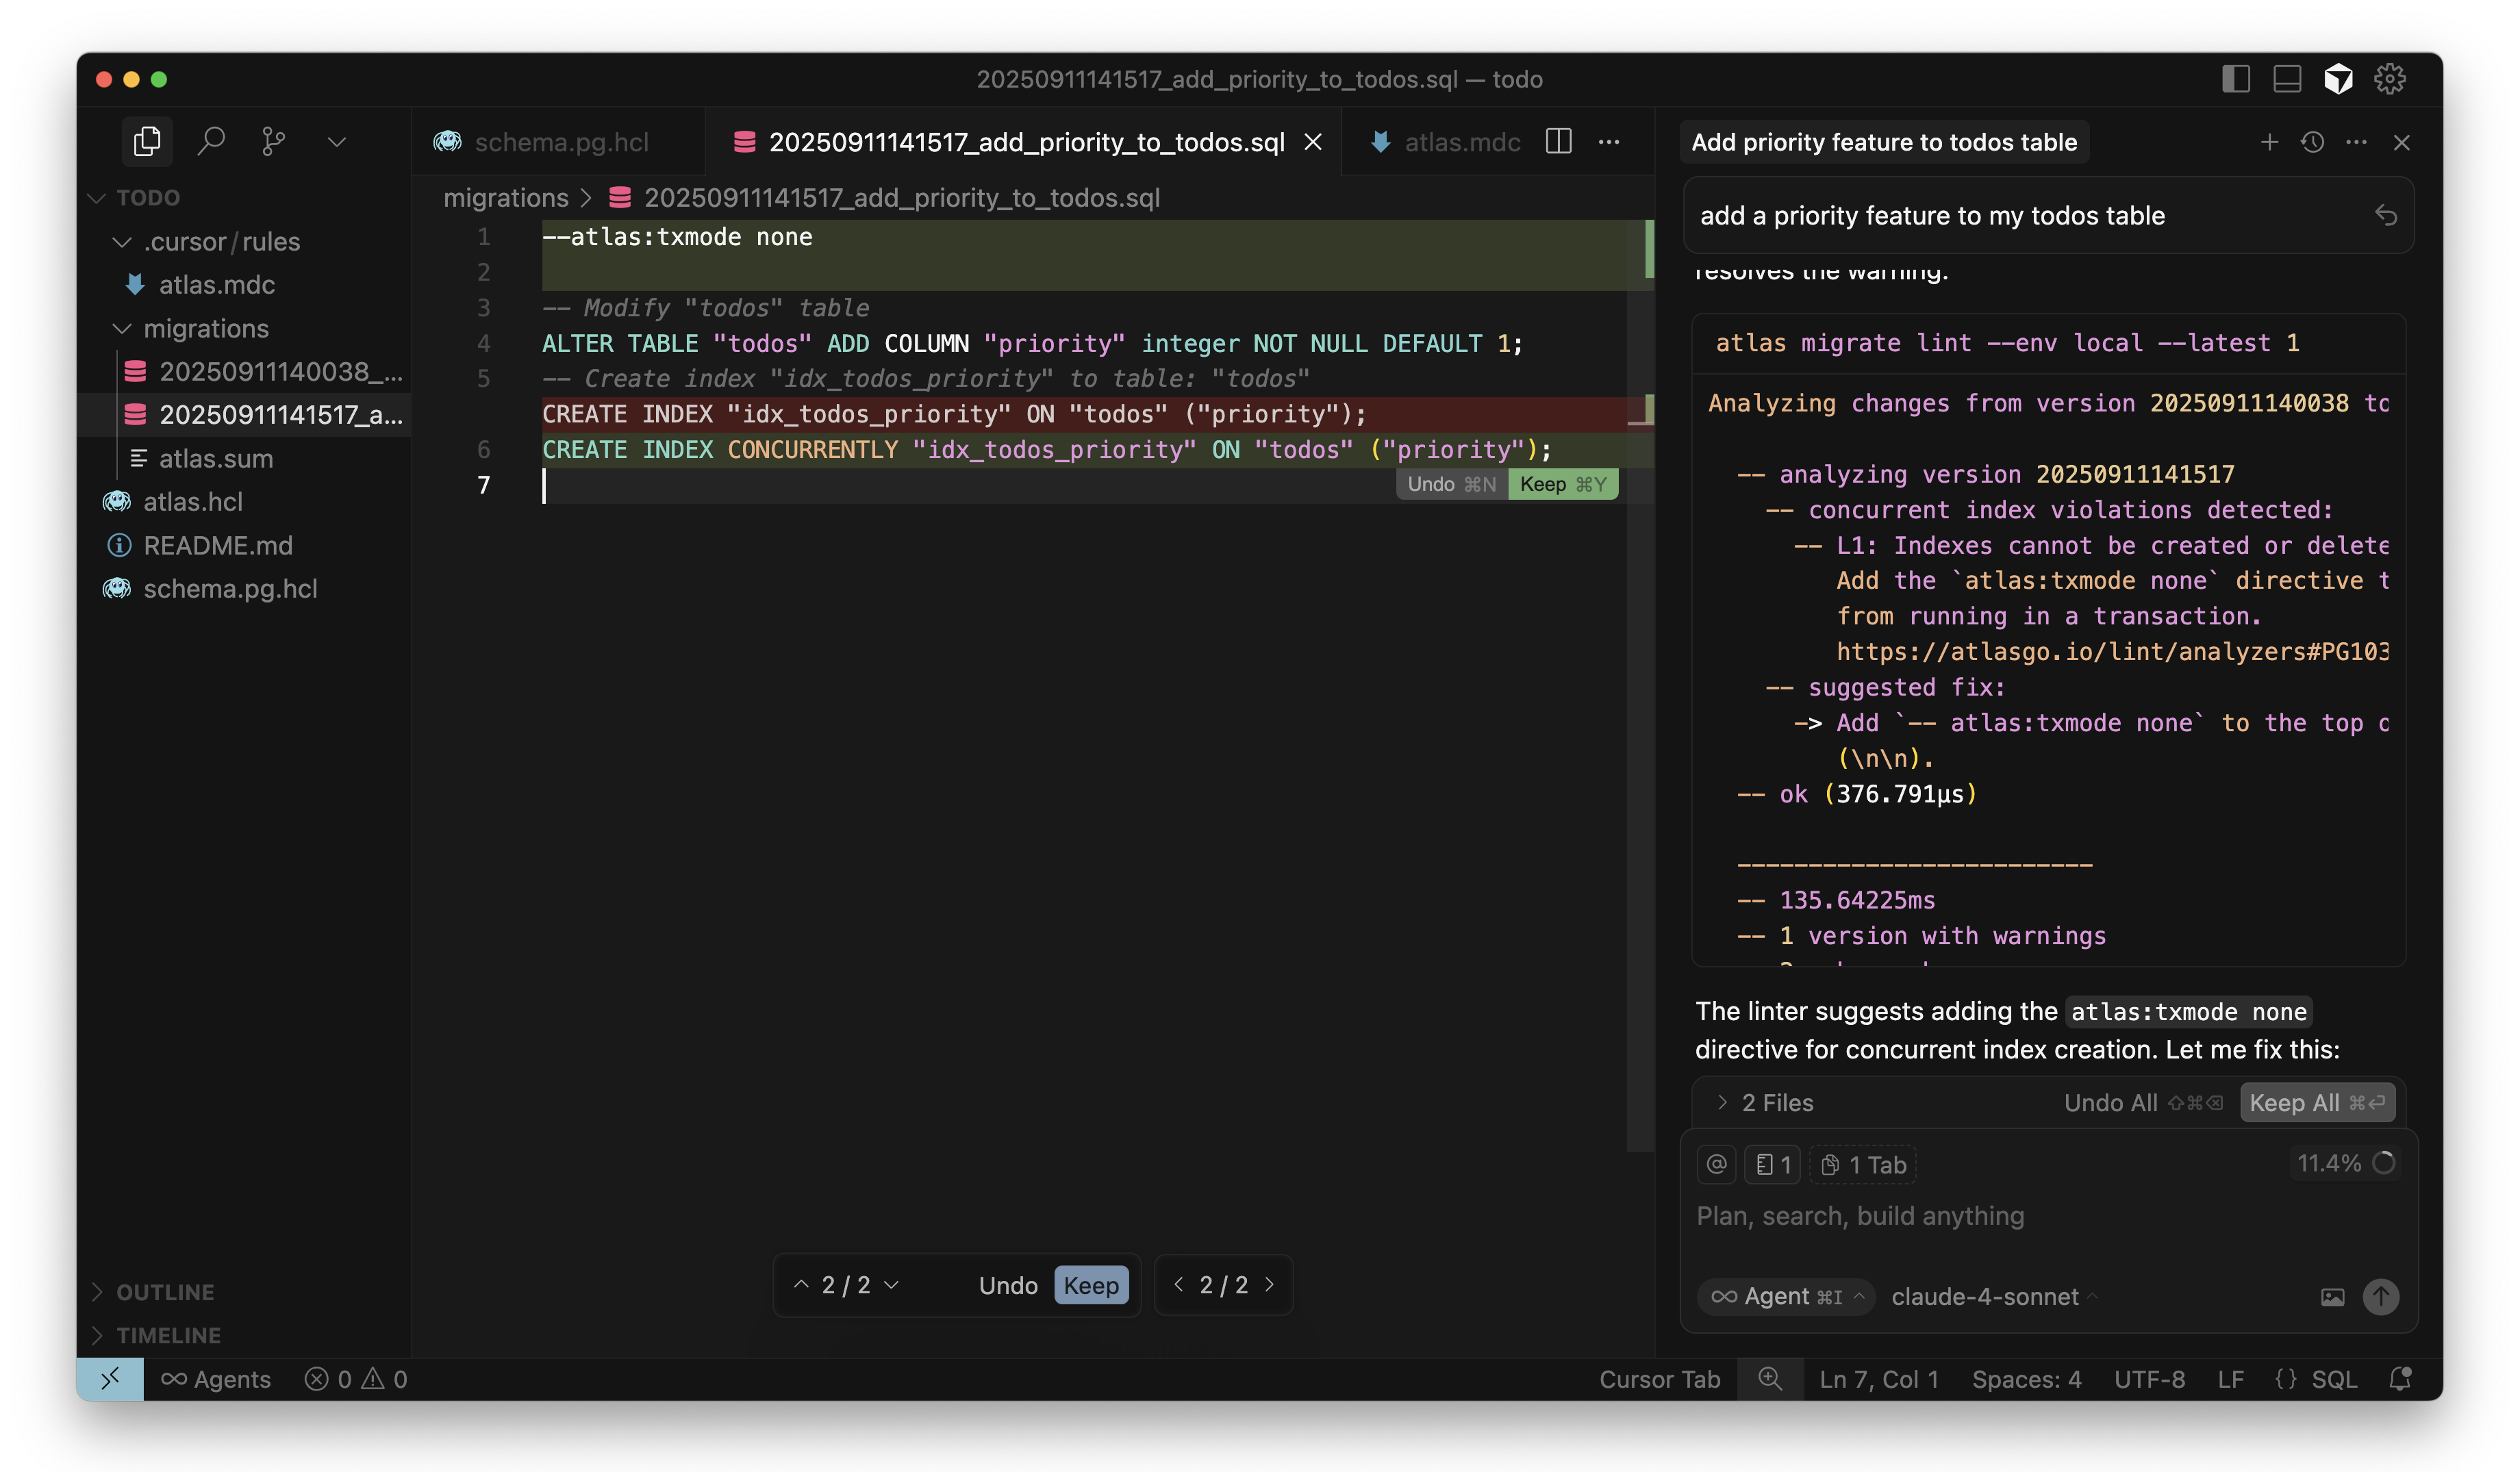
Cursor sets atlas:txmode to none in migration
For Atlas Pro users, the agent should also run atlas migrate test to validate any data migrations.
3. Apply to the database
Once the migration file is validated, the AI agent should apply it to the database by running atlas migrate apply, starting
with a dry run. The --dry-run flag results in this command only printing out the pending migration
statements without executing them, allowing you to review the changes before they are applied. This also triggers any
pre-migration checks so you can ensure the migration is safe to apply.
After the dry run, the agent should run atlas migrate apply without this flag to actually apply the migration to the target
database. It should then run atlas migrate status to verify the migration was applied successfully.
$ atlas migrate status --env local
Migration Status: OK
  -- Current Version: 20250818121430
  -- Next Version:    Already at latest version
  -- Executed Files:  2
  -- Pending Files:   0
Next Steps
Atlas can bring safety and reliability by establishing guardrails that will help you and your team move fast with confidence. By configuring your AI agents to work with Atlas, you can ensure that schema changes are made safely and consistently.
To set up your AI agent with Atlas, check out our AI Tools guide.
With the instructions set up, some example prompts you can use with your AI agent to test it with Atlas include:
- "Add an
agecolumn to theuserstable" - "Build Feature X in my application"
- "Make sure that all tables must have a non-nullable
created_attimestamp column with a default value of the current timestamp" - "Reorganize my tables so all user data is in one schema and all product data is in another schema"
To continue this conversation and get direct assistance with your setup, join our Discord server.